Want to propagate your monster Monstera? Look no further than this helpful guide from Leaf and Paw.
First off, this was posted in 2018 but has since been updated in 2022. And a special thanks to the thousands of readers for making this post go viral! I also talk about how to propagate a variegated Monstera albo here.
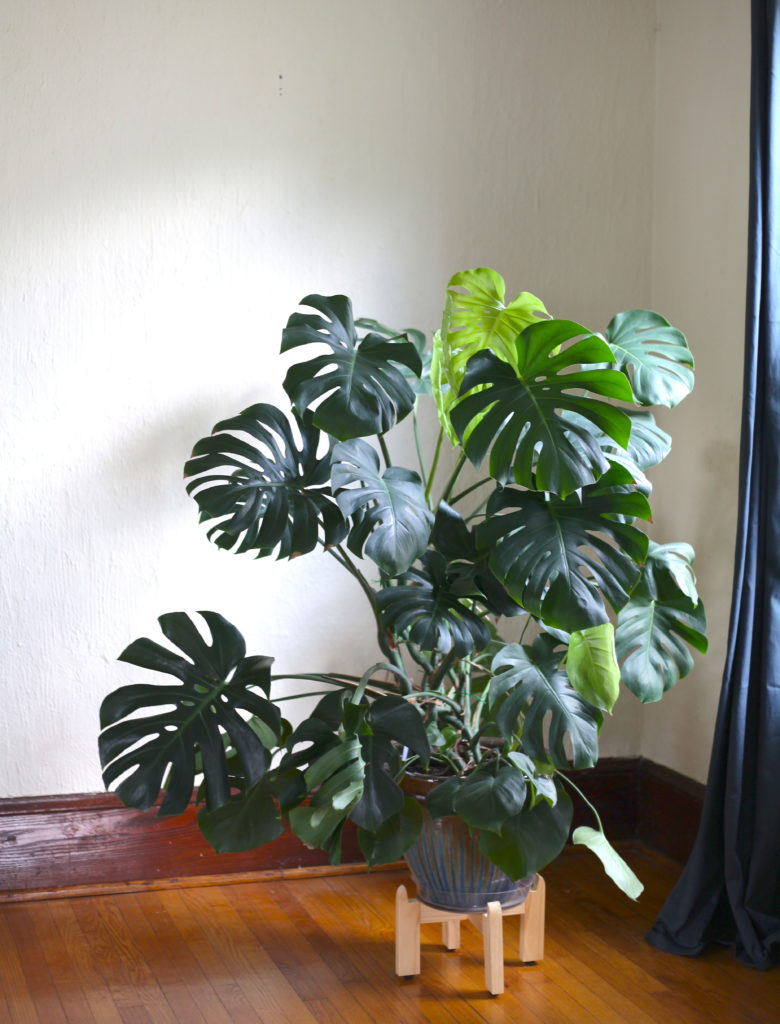
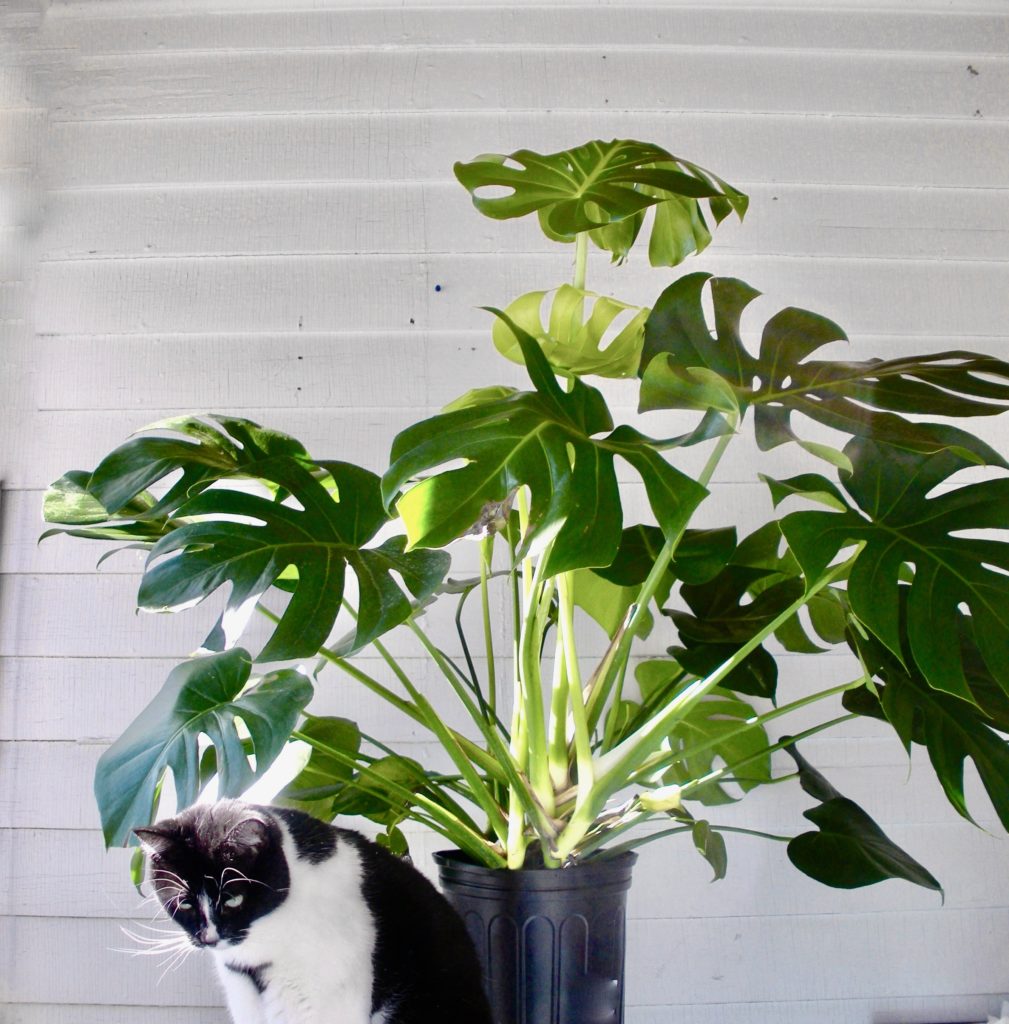
Monty, my Monstera, became just too big in seven short months. Easily doubling in size, his leaves began to sprout every which way. Chaos ensued, and stems grew awkwardly horizontal. After repotting, he only became happier and unfurled another four leaves in a few weeks. Yes, of course I was a proud plant mom. I was the proudest mom in the whole world. But Monty was dominating my living room and I realized I had to do something.
I hate pruning plants. Cutting, shaping, any kind of trimming plants in any fashion is terrifying. The fear stems from the idea that I will either:
- Kill the plant
- Make it stop growing and it will never grow again
- Prune incorrectly and sadly end up with 1 and 2
- All of the above and cry.
But Monty was too big. I had to do something. My love for all Monsteras is far and wide so I decided to strategically prune Monty to propagate him. Honesty, after pruning, it was the best thing I could do. The best part – more Montys!
Why We Propagate.
Plants (like people) grow and grow, but they don’t (like people) always grow the way you want them to. As Monty grew as wide as a boat, that gave me incentive to cancel his dietician and fitness coach and do everyone a favor and prune. This allowed me (to attempt) to make him the shape I wanted. The goal was taller, rather than wide. Also, since Monty was a very healthy plant, pruning actually encourages growth! And who doesn’t love the thought of having little Monsteras around.
Now, I did my research on the best way to propagate, mind you, but I was still terrified. When I did propagating in the past, sometimes the cutting ends up moldy or shrivels – resulting in so many bad emotions. I was determined to not have this happen to Monty Jr.
How We Propagate.
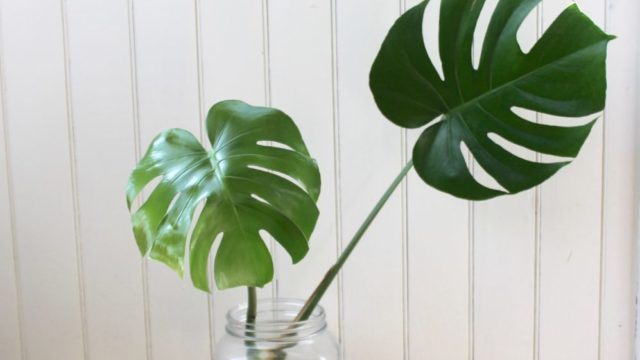
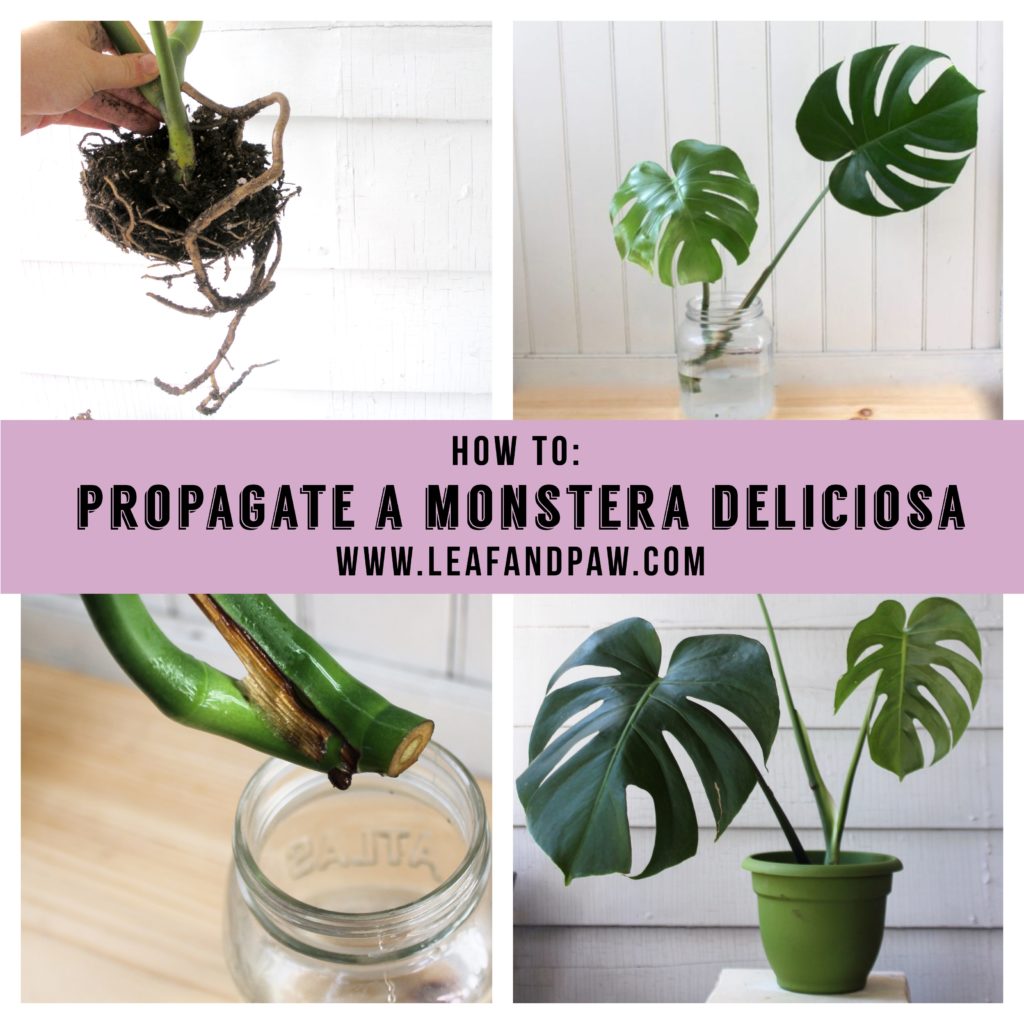
There are a couple ways you can propagate a Monstera deliciosa, also called a Swiss Cheese Plant. I gathered some tools and started by chopping off one giant stem and chose the rooting method.
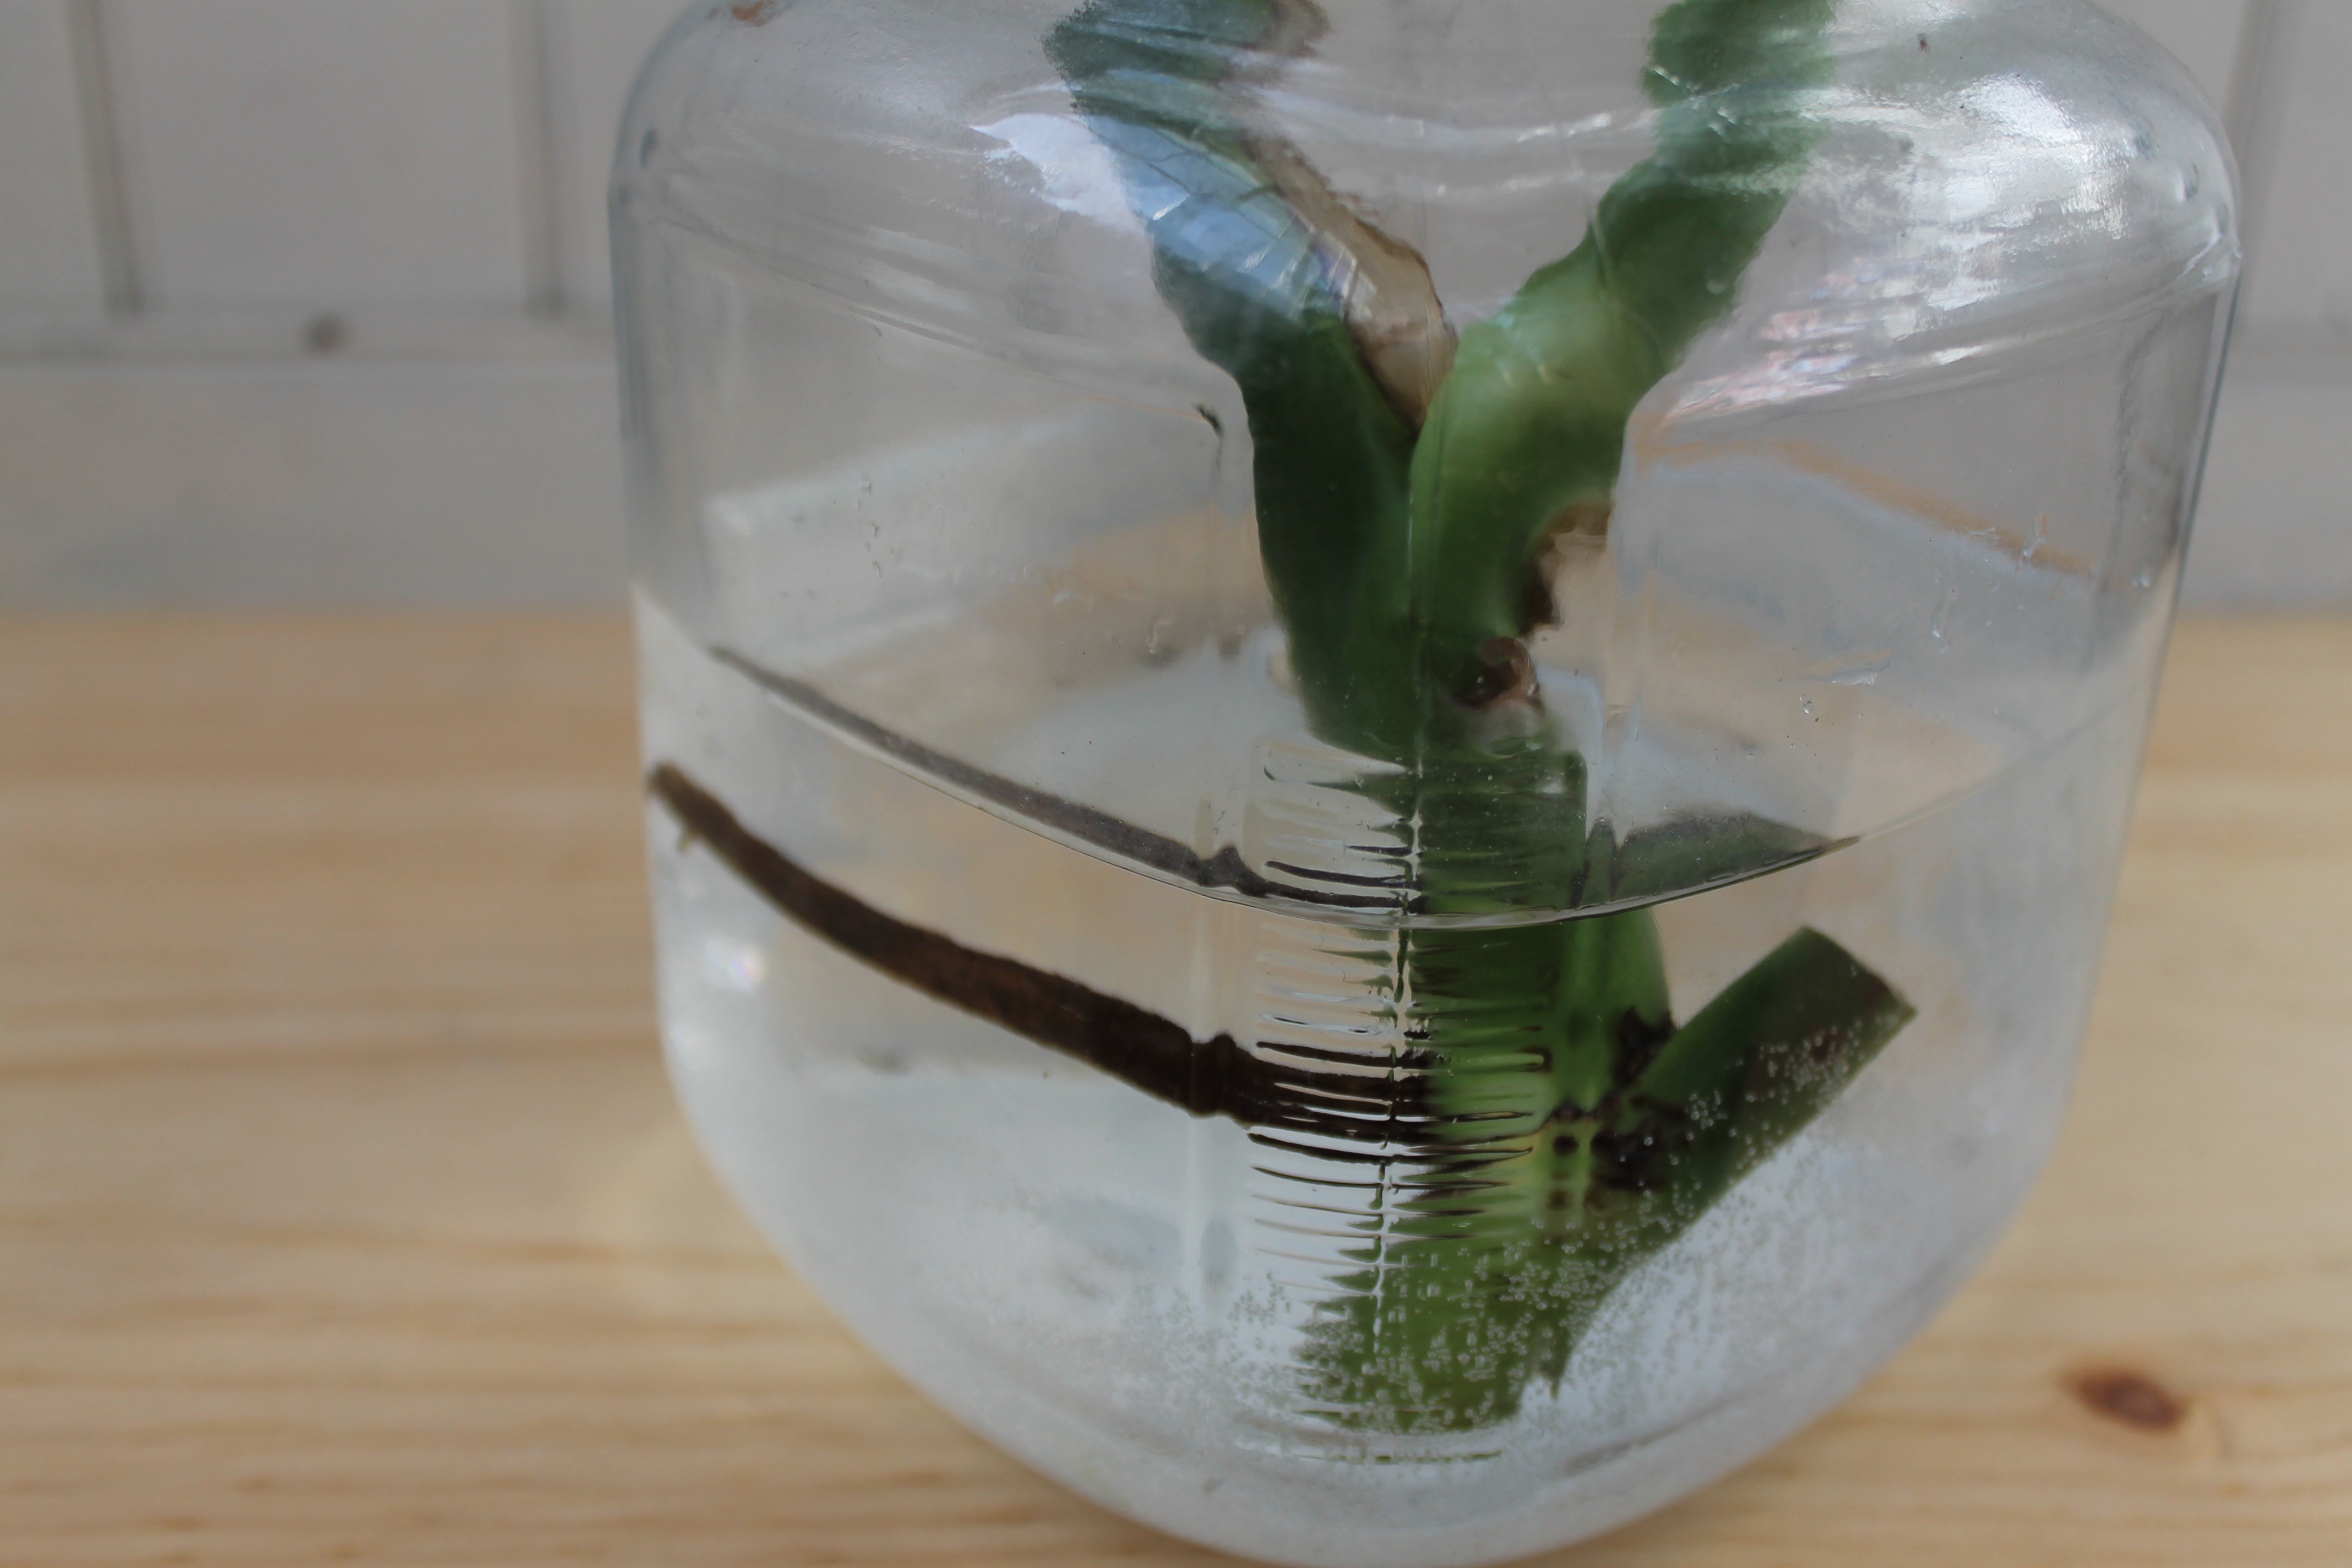
The segment I picked had an aerial root and node (see Step 1) and I took this as an opportunity to speed up the process by enticing this root to grow. I selected a chunk on Monty that not only had two stems, also called petioles, but also had at least two leaves, too.
You may be tempted to propagate a Monstera with just a leaf. This won’t work, I’ve tried. You need to have a node and/or a root present for propagation to happen and be successful. Just a stem with a leaf will sit in a glass jar just fine (like cut flowers) but it will not grow roots and will eventually turn yellow and sadly pass (like cut flowers).
These were the steps I took to ensure Monty Jr. would grow up big and strong:
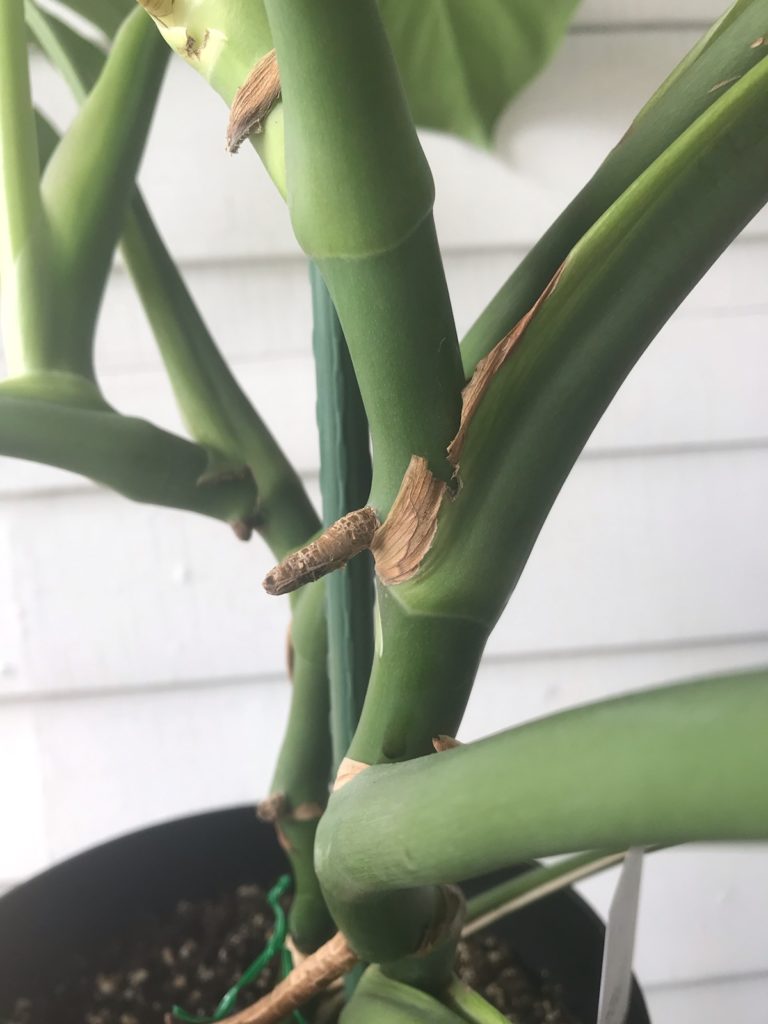
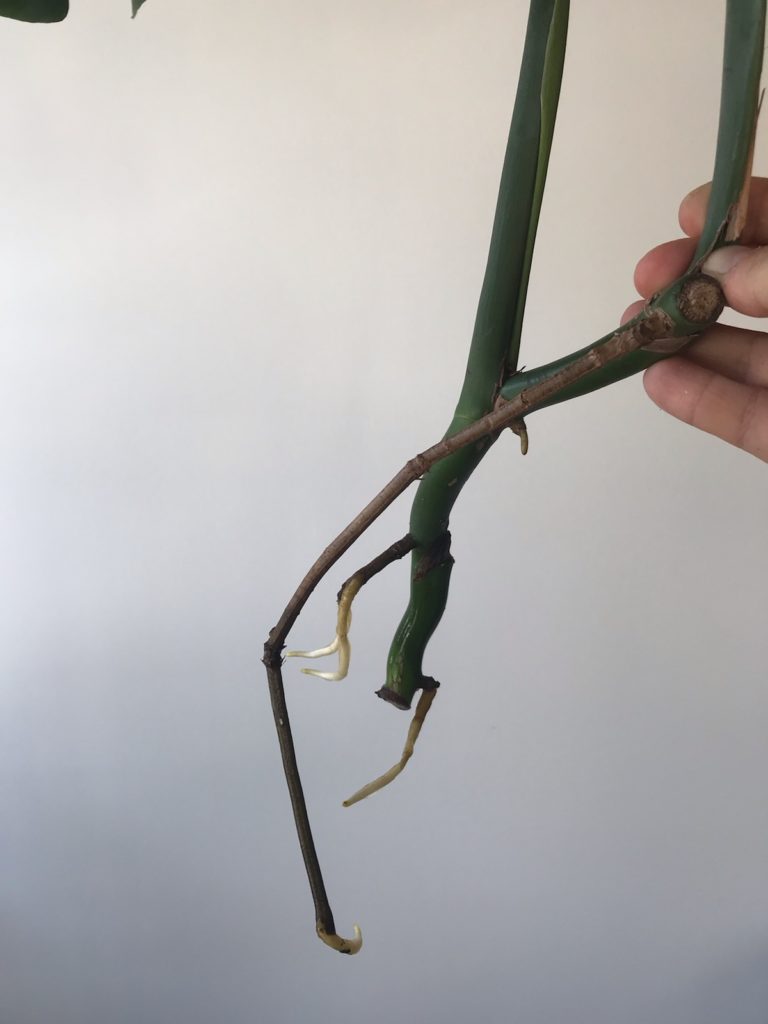
- Find the Node
Look your monstera over and find the node. This little nub is key and will be the ONLY way you can propagate as it turns into a root. It looks kind of like kind of like a plant pimple, and is located at a petiole intersection.
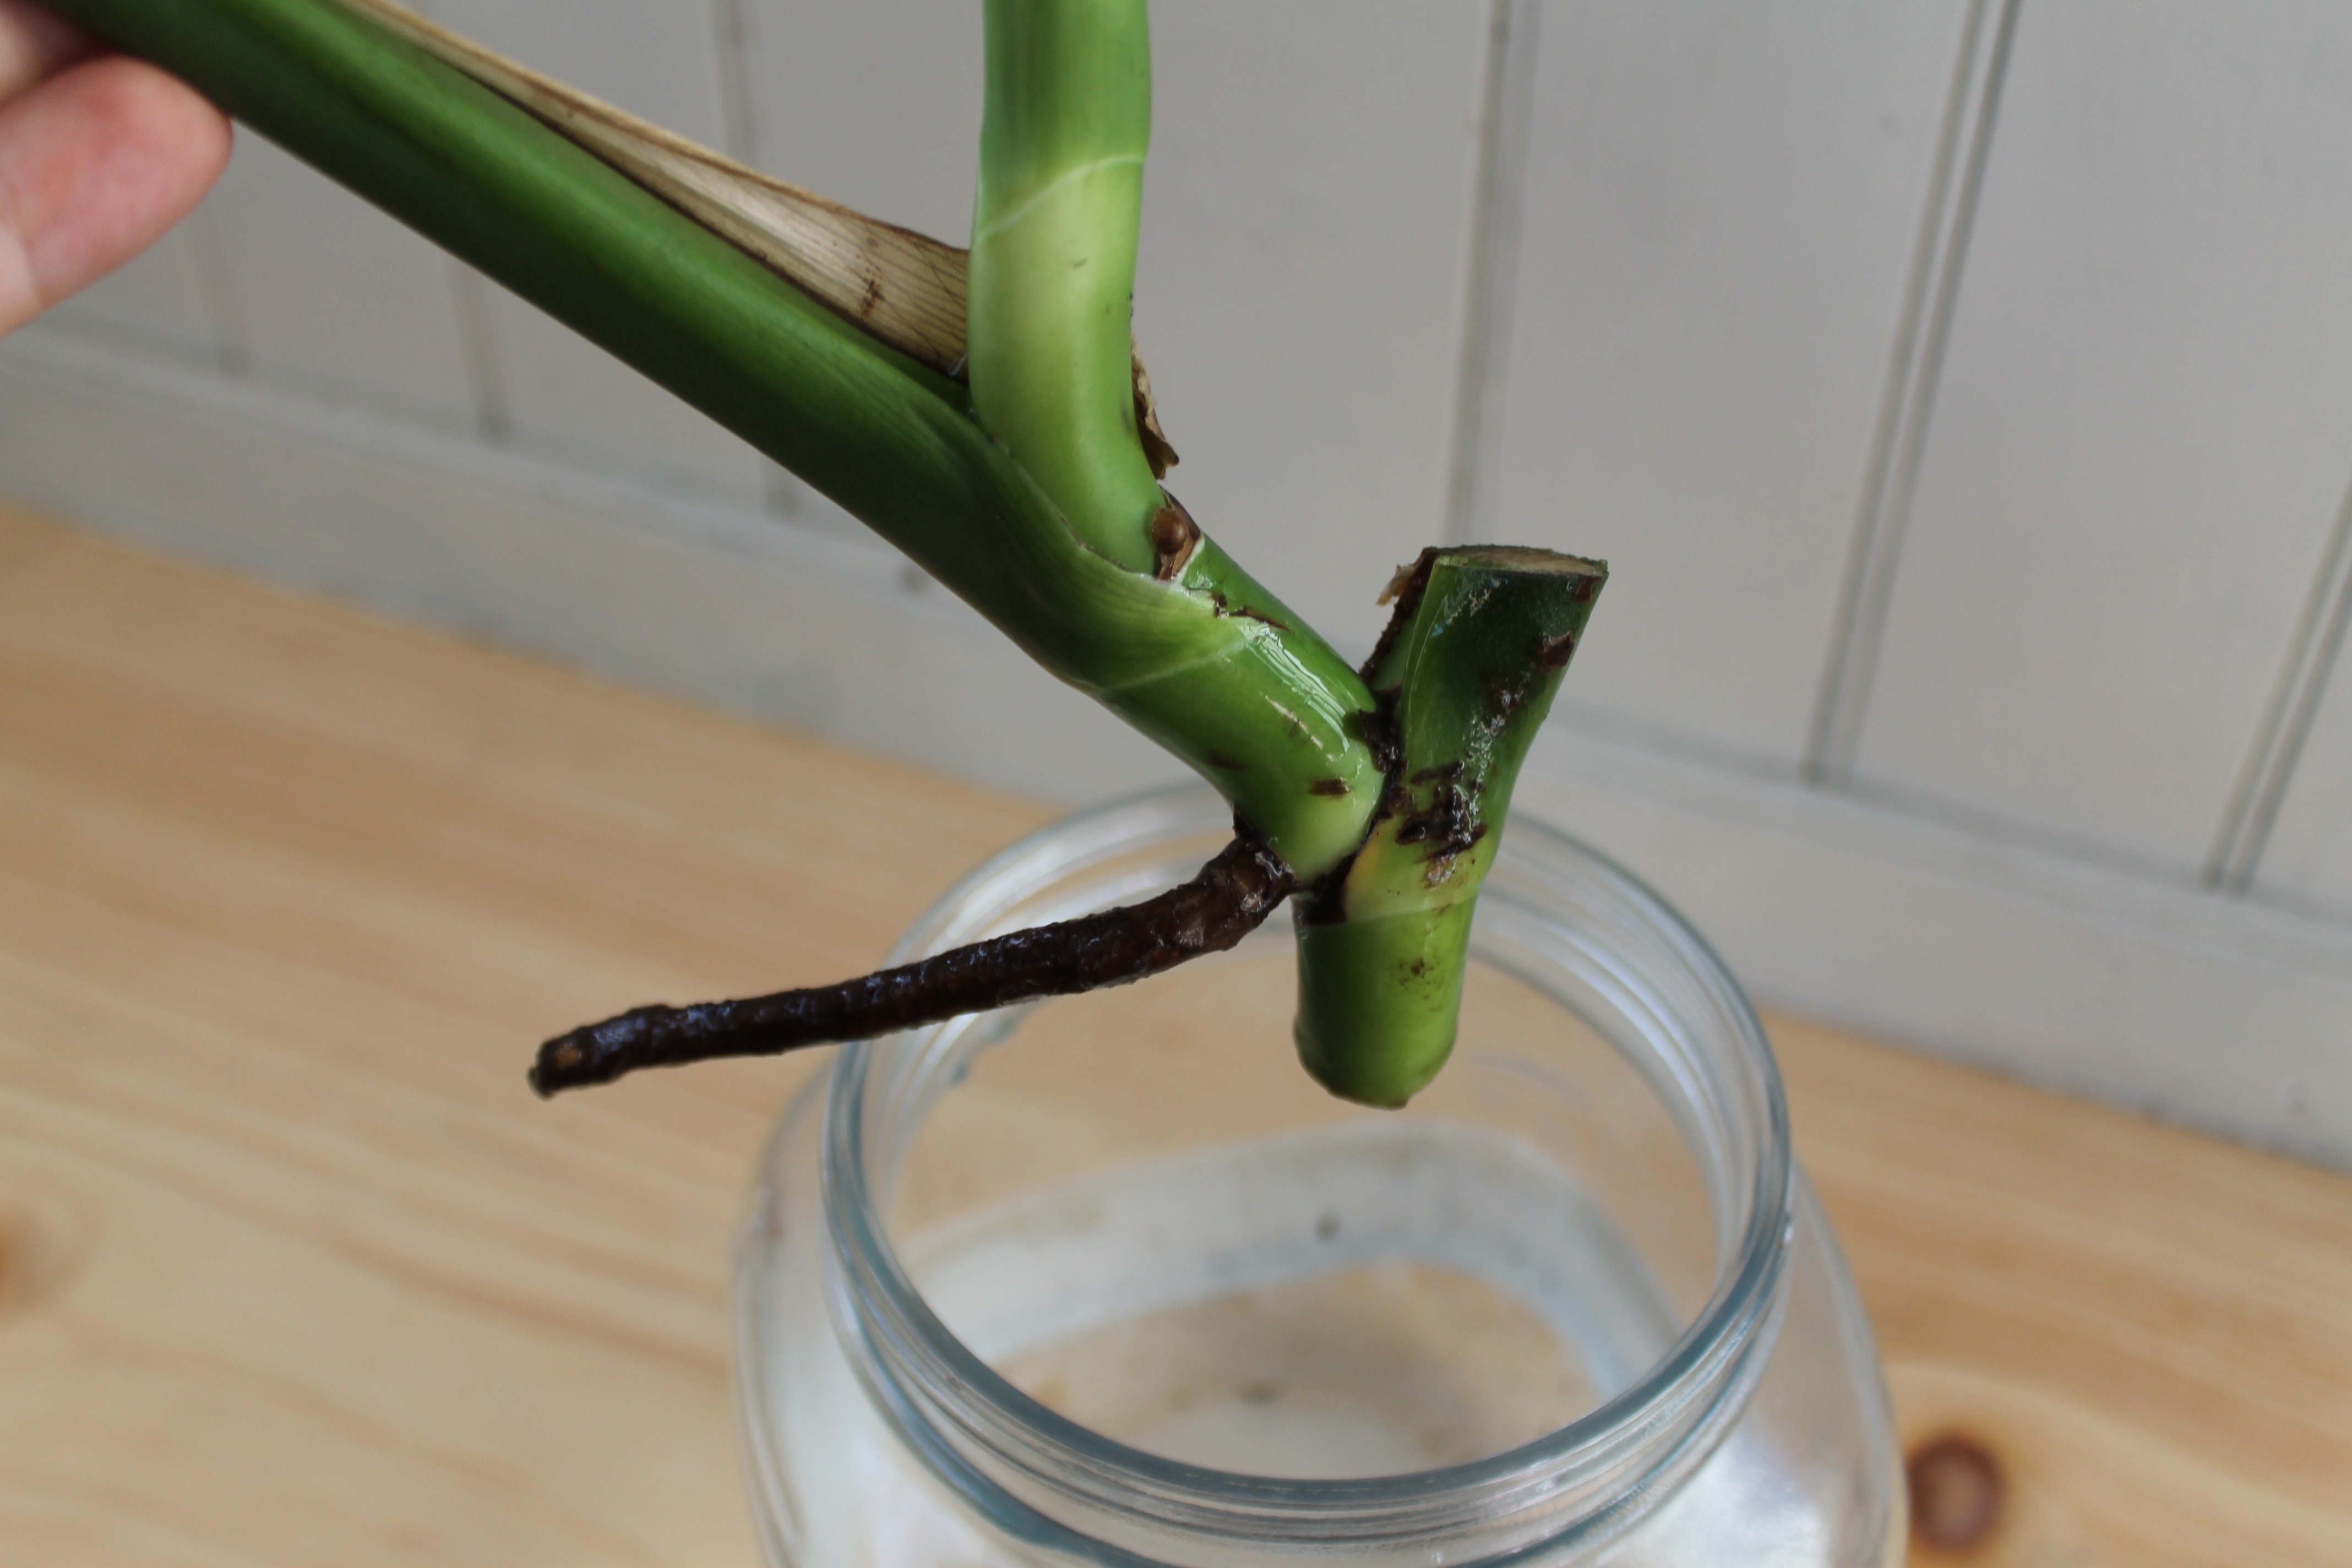
- Snip the Stem
With sharp sheers (I like these) I snipped the stem to include this aerial root or node and leaves in one. After taking this cutting this from the main plant, I washed it under filtered water.
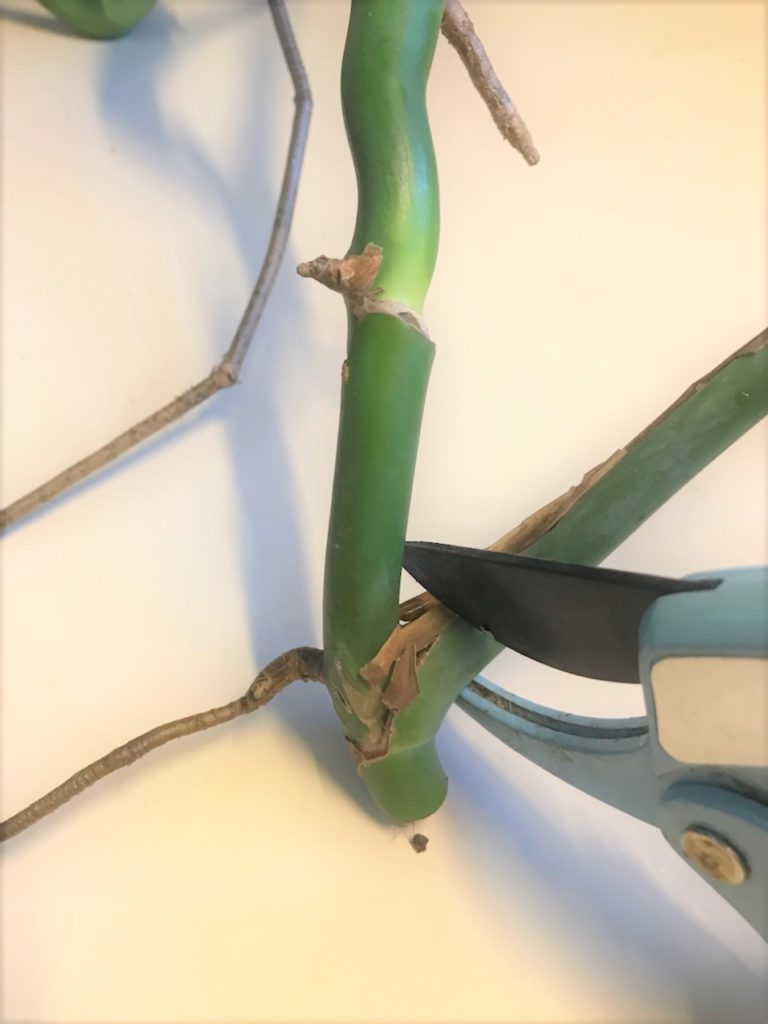
- Snip extra leaves
If there were any extra leaves, this would be the time to remove them. Two to three leaves are fine, but remove any additional.
- Time for Water
I cleaned and filled a glass jar (no lid needed) halfway with room temperature, filtered water (chlorine is not good eats for young plants).
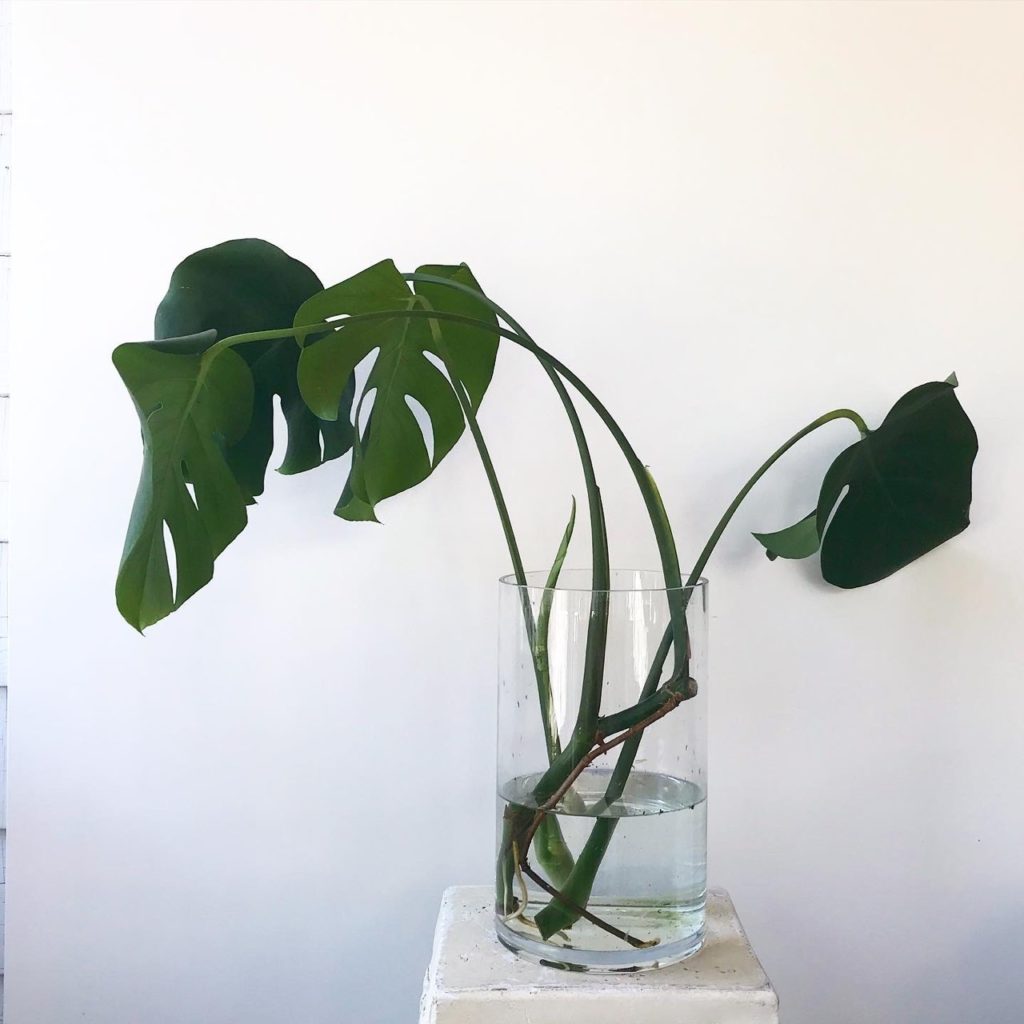
- Position the Cutting
I carefully positioned the cutting so it remained upright. You can always try a rig with twist ties, get a taller jar (like I did) or lean the plant on the jar lip to keep it centered.

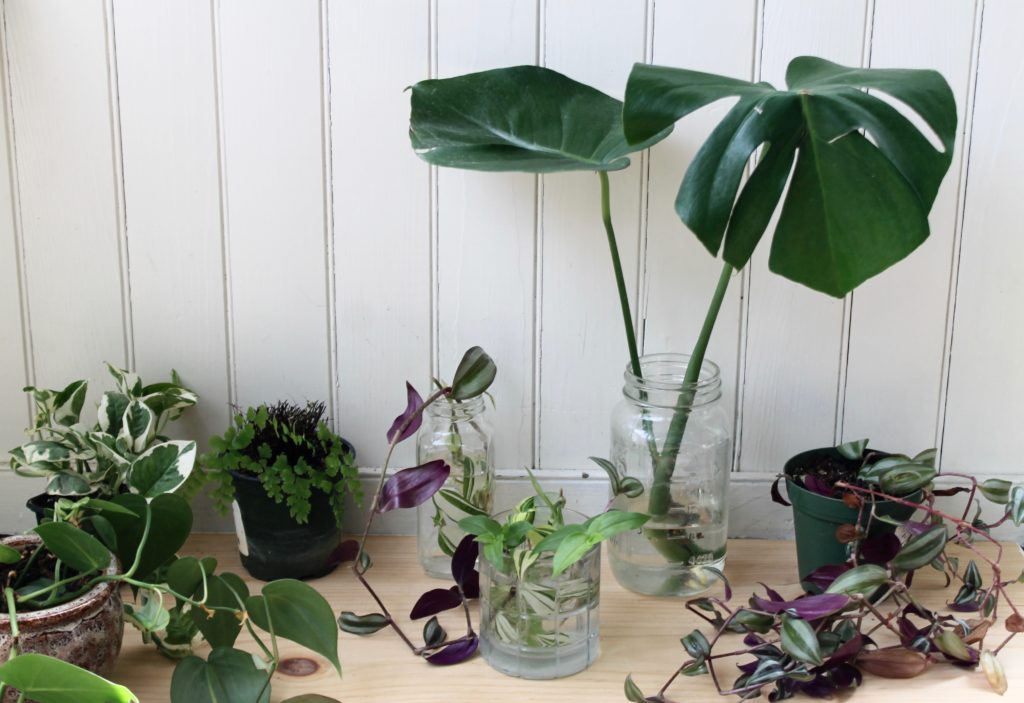
Every couple days or so I would quickly rinse the roots and supply Monty Jr with fresh water. In about a month or so, I started to see good things happen. An aerial root, which would became the plant’s backbone securing it in the soil grew roots and that small node (remember that little nub?) grew some chunky white roots too.
Keep in mind, I performed this surgery in mid-summer, so promptly placing Monty Jr in my humid, sunny, screened porch was I-D-E-A-L. And honestly, I would not attempt this in winter anyway, since plants become somewhat dormant and hibernate-y. Be a good person and don’t disturb them.
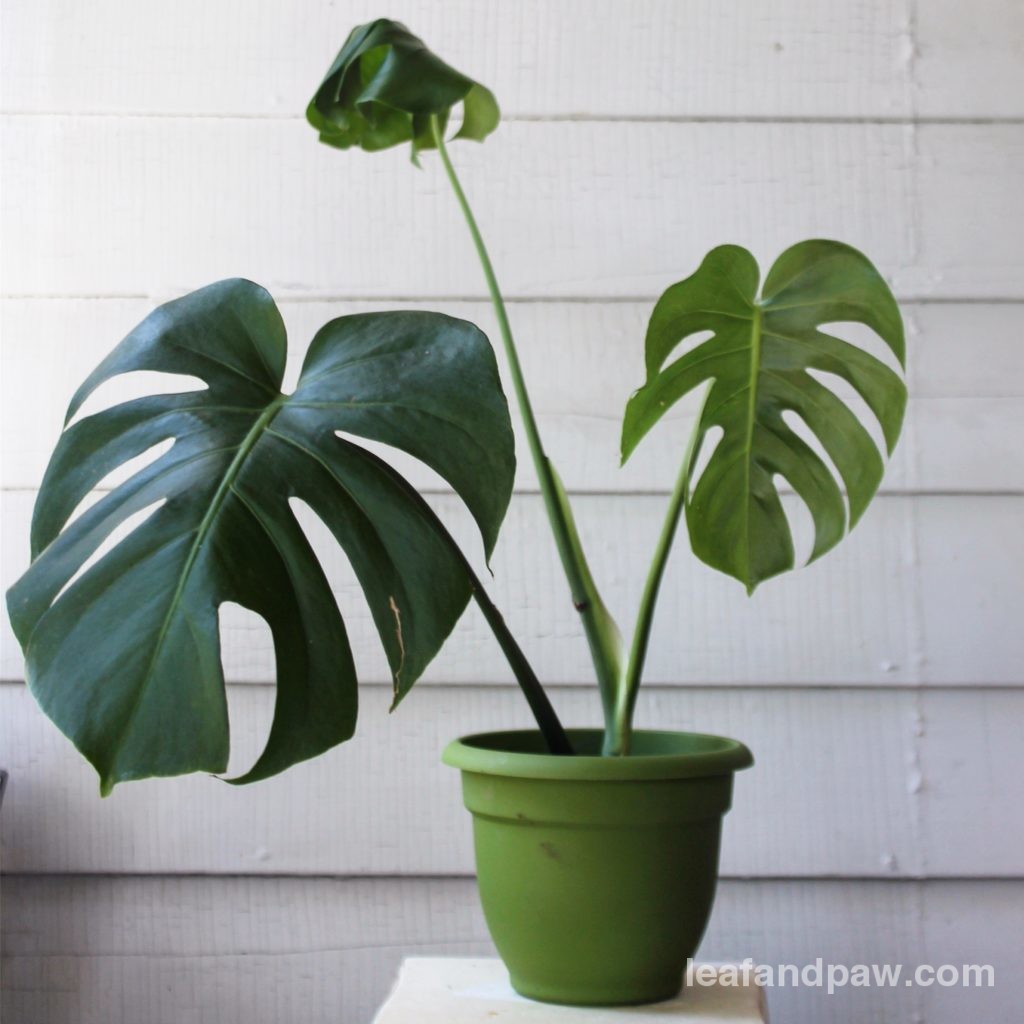
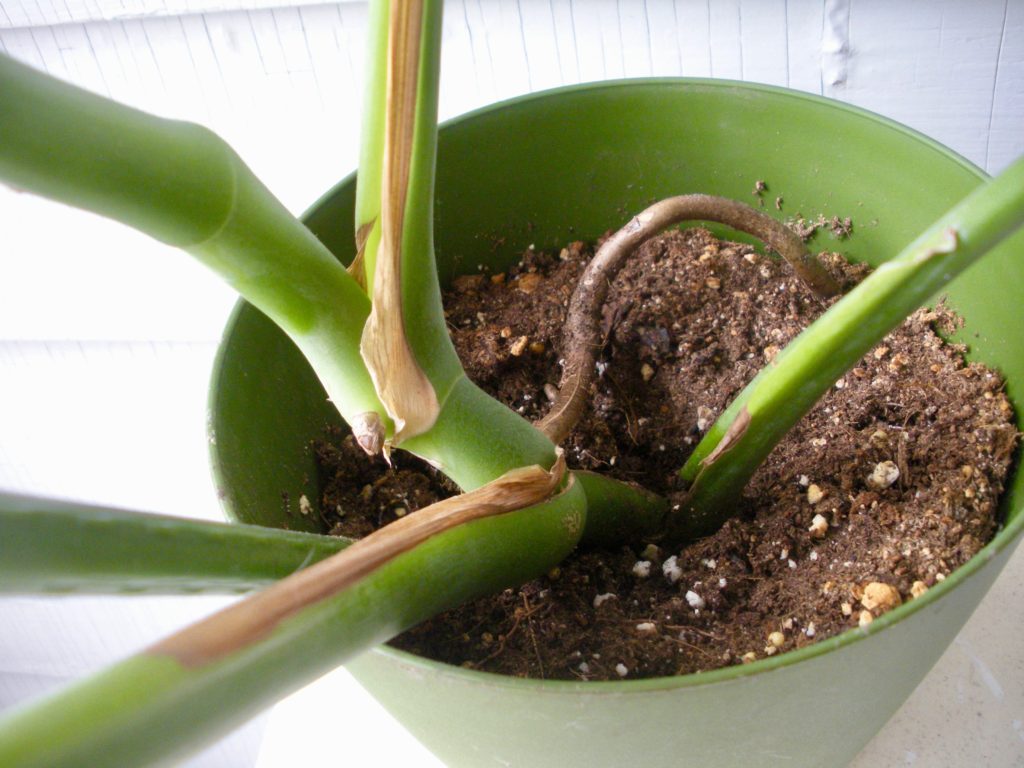
I let Monty Jr soak in his bath for a good two months before planting. I used one of my good ol’ standby pots that’s plastic and sturdy, perfect for starting-out saplings. Filling lightly and not pressing the soil down, I put Monty Jr in his new home. He spent the rest of the summer-early fall on the porch, but as soon as the evening degrees dropped I took him in. New cuttings just seem like they would be more sensitive to influxes in temperatures, so I played it safe. I’m right, right?
With the second cutting I did a few weeks later, after I had proven I was a capable parent, I attempted a take on an air layering method. After Monty Jr. worked out so well, Monty Jr. II (yes, that reads Monty Junior the Second) was cut off Monty the same way, but this time wrapped in moss on Monty rather than placed in water. Air layering involves forcing roots to develop on the mother plant, then you can snip the stem off.
How to Air Layer
- Step 1: Assemble the hardware – you’ll need some sphagnum moss (note: do not use dyed moss, it will get all over your hands when wet and stain everything for days), plastic wrap, and twisty ties.
- Step 2: Go ahead and make an incision cut on the monstera stem, include the node (or nub) – that will be your aerial root. The incision should be below all of this.
- Step 3: On the plant, wrap the node, any roots, and the incision with moistened sphagnum moss.
- Step 4: Wrap that bundle in plastic wrap and secure with twisty ties. This won’t be wrapped forever, and you should see roots really start to develop from the node in a couple months. Every few days, you’ll need to unwrap the root package remoisten the moss. A spray bottle works for this best, I think.
- In couple months, you’ll notice large roots have begin to grow on the plant in the moss package. Cut the stem clean off where the incision once was and pot away!

Nine Months Later.
Both mini Montys are happier than ever. They produce new leaves even though it is February and nature is dead inside. See above for the full roots that formed – cool right? Below is a new node developing on Monty Jr – it doesn’t take long!
And how is Monty the Monstera doing? He still leans a bit to one side and is still the best cat-hiding spot in the house. Plus, this whole process inspired me to buy a Monstera albo all of the other Monsteras in existence and propagate them.
Share this post! Pin this pinnable pin, please.
Check out L&P’s other propagation posts, too, on propagating Watermelon Peperomia and Rubber Trees.

Hi can I just cut a stem at the base and put them in water? One stem and leaf? Not exactly sure where to cut?
Thank you in advance. Pam
Hi Pam, Cutting a piece that includes the node (the little nub in the photos above) is the crucial part in propagating. So, just a leaf and stem probably won’t work out. Usually there is a stem that produces two leaves and at the base of that stem is the node – you’ll want to cut below that. Feel free to post photos of your Monstera (either here or on leafandpaw’s Facebook page) and I’d be happy to give you more help!
Is it possible to circle the area where its ok to cut so there is no confusion?
I can add that yes! Ideally you want to cut a centimeter or two below a node.
El pipi (orines)de gato no la daña? Yo tengo un gato y las orina y se me mueren 😔
I have an indoor monstera that looks like Monty. I’ve been reading that I should stake it but I would prefer to just keep it bushy rather than grow taller. Do I need to stake it or can I just prune to keep it under control?
Hi Anna, I’ve done both. Monty is very much growing horizontally and staking actually does encourage vertical growth, but pruning the awkward stems did help shape him a bit better last year. I have about 4-5 stakes to keep him somewhat vertical and plan on pruning the unwieldy stems come spring. If you do decide to prune, wait until it gets a tad warmer, like 70 degrees or so, since he’ll be able to recover better. Hope that helps!
Hi there!
I have a Monstera cutting from months ago that I had kept in water. It has many many roots now! When is a good time for this leaf with roots to be planted into soil?
Thanks!
Hi! If it has many roots that’s a sure sign! You can plant it any day at this point. Pick a nice planter that’s a tad bit bigger than the circumference of the root ball and use good quality indoor plant soil. He’ll be happy as a clam in no time. 🙂
Hi Anastasia, do I really cut the stem off above the new roots when I plant a newly rooted cutting? That makes me so nervous. ?
Hi Kristin, any cutting that you are propagating should include a root and there shouldn’t be any reason to cut the stem off a new cutting. I may be confused by your question – so feel free to shoot me a DM on Instagram with a pic – and I should be able to help better.
Hi, I bought a monstera it came in a bit of soil in cling film, do I put it in soil or water
Hi Eva! Transfer to water first and monitor the roots. If there aren’t many roots, let it hang out in water for a few months. Roots should be 6″ long minimum before planting.
Hi there! I am super worried. I have been looking for this plant for a while without success, until I went to an appointment yesterday and I noticed this huge Monstera! The person gave me a cutting with a huge leaf, but I realized after coming home that there is no node on it. He cut it at the base where two stems were growing but there is no node. I put it in water but now after reading online I am super afraid it won’t do anything, and I am not sure I can ask for another one…. is there any hope?
Hi Catherine! Don’t lose hope yet – you might actually be fine. I would place it in water for a few weeks and see if anything happens. If I’m picturing how your cutting looks (feel free to post a pic) a node should pop up and develop. If it was cut too close to the base you won’t have any luck. If you can’t attach a photo in the comments here – feel free to post on Leaf and Paw’s facebook page and that would give me a better idea. Either way, place it in water. Good luck!
My Monstera deliciosa went vertical and not horizontal. I have a single stem probably over 2″ in diameter with a height of almost 8′. I was reading that is the way they grow in the wild in order to climb up trees to reach the sunlight.
Hi there!
Thanks for the post! I have been propagating Monsteras for a little while now and am loving both the cuttings in the glass and my already potted rooted plants.
My first question: I recently repotted some rooted Monstera plants, but decided to put them in separate pots. Now I realize that I could have planted them in one larger pot and had a bit bushier set up! Would it stress the plants too much if I repotted them again now?
My second question: Do you have a particular potting mix for Monstera that you recommend? My biggest (30+ year) plant that I received as a gift only has lava rock in it, but I’m somehow unsure if that would be too much for the newly rooted plants…
Hi Julia! As long as the weather is warm where you live and the monsteras are out of their winter dormant stage, it would be fine to replant/consolidate. To answer your second question, I just use an organic indoor plant soil with a bit of perlite/orchid mix and rocks at the bottom of the pot. All of my monsteras are happy with that mix. The lava rock may be a bit much in my opinion, so I would suggest reporting in something like a plain indoor plant mix (you can add the extras I do too if you like). Hope that helps and thanks for reading!
Hey there! My friend has a monstera, and when I asked for a cutting he gave me a piece of the root! I’m not quite sure what to do with it, or if I can even get a plant from this piece of root. Can you help? Thank you!
Hi Samantha, all hope may not be lost! I would need to see a photo – that would definitely help me see if there’s a chance of propagation. You can post one on Leaf and Paw’s facebook page and I’d be happy to take a look!
Hi! My Monstera, also named Monty (Go Figure!), has outgrown himself in a matter of 2 months! He is now growing lopsided and is looking very bushy. I decided it was time to give him a hair cut, thus began my Pinterest search for tips on propogating (because who wouldn’t want more Montys running around!!!!). Your page was the first that I stumbled across, and arguably the best! Thank you for your clear directions and simple pictures. I decided to cut off a branch with three leaves and 2 ariel nodes and I am excited to watch Marty grow! I’ll send some pics your way on the leafandpaw Facebook page! Thanks again!!! 🙂
So glad I can help out and thanks so much for reading, Delaney! I hope you check back often for lots of helpful hints. 🙂
Hi!
I recently stumbled upon a variegated monstera plant, I was able to get a good chunk of the matured root base but unfortunately the leaf that was attached snapped off!!! 🙁
I currently have the roots in water and I have noticed some new growth, however with no leaf, will this still propagate? I feel good about it, but being such a rare find I figured I’d get as much input as possible!
Ps, there is what looks to be the beginning of a new leaf, do you think this will continue to mature since it was uprooted?
Can I have a cutting, too? Just kidding, but I’m looking for one if you find another! To answer your question, Tyler, I think you’ll be ok. A new leaf looks like a little fold coming from the stem, and that’s a good sign. I would keep it in water until a leaf completely forms and roots are visible. Were you able to get a node on the cutting?
Hi! Thank you for this guide! I have two questions: 1. Is it possible to plant a stem and node directly into soil, or is it better to start in water? 2. What type of stake do you recommend? Is a piece of wood good enough, or should it be a moss totem?
Thanks!
Catherine
Hi Catherine! To answer your questions: 1. I’d definitely suggest starting in water to get the initial root going. Not sure if you would have as much luck just pitting them in soil. 2. I use just plain garden stakes like these: https://amzn.to/2M30TFt. Monty is about 5′ tall and I’m currently using 4-5 stakes to keep him upright. Plus I use them for all of my other large plants too. Thanks for reading!
Hello!
Okay, so I live in Kauai and there are beautiful monsteras all over the island. There were too stems sort of loose so I grabbed those to take home in hopes they could grow some roots. But, if they are just the stems (no nub or ariel root) will that even be possible?
Thank you!
Hi Emily – you are too lucky to live in a place with wild monsteras! As far as getting them to root, the stems won’t be enough – they’ll need a node which turns into the roots. You may need to get another cutting. Those stems will look great in a vase though!
Hi my mo stera doesnt have any node or aerial root. I just tried cutting it on its stem… how’s that? I kept on searching the net for no nodes but to no avail 🙁 pls help
Hi Candy – you’ll need a little black node on the stem, that’s where the roots grow from. So, you’ll most likely need another cutting if you only have the green stem. Good luck!
Anastasia –
I see that your beautiful feline is in a lot of pictures with your monstera. I was told and have read that monstera are poisonous for cats. Could you tell me about this if you know. I have a huge monstera and he is outside because I’m afraid for my 3 cats. Thank you so much!
Christine
Hi Christine! They are *technically* toxic, but my cats in particular are not interested at all in eating them, which is only when they are considered dangerous. If you haven’t already, you can read my post about Monty, my Monstera here: https://leafandpaw.com/2017/03/21/indoor-plants-monstera/. I talk a bit about why I keep Monsteras in my home with cats. I hope that helps clear the air!
Hi!
I have a question about the Monstera that I can’t find anywhere on the internet. I was hoping you could help me out. We bought a Monstera Delicious like a month ago. The first new leaves had many holes in them, but now all the new leafs are just plain leaves without holes. I thought it had something to do with too much / too little sunlight, but I can’t find anything about it.
Hi Lynn! I actually just wrote a blog post about this! Here’s what I found out: Since Monsteras grow along and up trees, so, primarily in shaded areas, these holes allow sunlight to pass though to the base of the plant for photosynthesis / energy. Hole-lier leaves tend to be bigger, which have more surface area to grab sunlight – helping them as they grow vertically and closely against trees. These holes also allow rain to pass and trickle down to their roots as well.
Hi just wondering what happened to the branch on the mother plant? Did that stem grow back? Or did it just dry up?
Hi Yin – the branch actually just hardens over – but I do have several new smaller leaves from it, though. The stem will never grow back fully, but depending on where the cutting was cut, you’ll probably end up with some more leaf shoots that will hopefully become branches.
Hi!
I’m looking to propagate my monstera plant as it seemed to be root bound and have stopped growing. All the nodes have grown long and has a protective layer around them. If I propagate my plant do I trim the long nodes then cut to propagate? Not sure what to do as I do not see any more baby nodes.
Hi Diana! There should always be baby node, but yes you can cut a stem with one of the roots. I would let the cutting sit in a glass jar with water before you plant, for maybe a few weeks. From the sounds of it, you Monstera might be better off getting pruned quite a bit and benefit from a repotting. A plant should never stop growing and it definitely sounds pot bound. 🙁 Good luck!
What a great article and forum with so many tips.
Thank you.
I’ve found 3 neglected monsteras in my garden. They all seem very old with big beaches and stems (some branches are brown and woody-ish).
There is 1 plant that has 2 big leaves growing from the same point (stem?)
and already has a long established aerial root, rooted into the ground.
I would love to bring this one indoors.
Can I cut it below the stem and with the long aerial root? But this means I have to cut the root to free it from the ground.
I’m so worried I will kill it and waste the cutting.
Thank you.
Thank you Meng! Is there any chance you can dig up the root? Otherwise you should be fine cutting it, as long as you take a piece/stem that has a few nodes as well. I would place the cutting in a glass jar with water until that root acclimates, then you should be able to plant and bring indoors. Feel free to share photos on L&P’s facebook page if you need more help.
Hi, i recently bought a monstera plant at a very low price as some leaves have holes eaten by worms. And i noticed there a few tiny worm crawling in the soil. I am thinking if i should repot the whole plant or propagate from part of it. If there is node found, does propogating with ariel roots work?
Hi Janelle! Congrats on your find. I would definitely repot. Take the Monstera out of the soil and discard it. I would then rinse the roots well under water and inspect them for damage. Pot in new soil and monitor for bugs. I would definitely wait to propagate it until it has healthy growth. Good luck!
Hi is the node you’re talking about the couple cm long little black bit sticking out in your pictures? I have never propagated because I get confused by what parts are what and what they’re supposed to look like.. thanks!
Hi Angel! Yes that is the node. In this post I actually have an illustration of a Monstera unrooted for reference. Hope that helps!
I have a Monstera that is about 10′ tall. I have a node that I put and water and it now has roots. Is there any reason not to put the smaller in the same pot? It is a very large pot
Hi Jerry, you definitely could as long as you had enough room. Because the roots grow so unwieldy, enough space would be the only issue, but if it’s a large pot you should be fine.
Hello! I just got a clipping from my friends monsters and it has a really long aerial root is it okay to cut it to make it a bit shorter or is that a no no?
Hi Melissa! Congrats – that’s a healthy clipping! But I would not cut it. What I do is wrap the root around (when you go to plant it) in a circle to match the diameter of the pot, so a giant root isn’t just hanging down. I hope that makes sense – let me know if you need more clarification. Good luck!
Hello! Thanks for the helpful post! I went on a 10 day vacation and came home to find that my monstera had grown a lot and sprouted several new leaves. However,the stems/leaves have fallen over and new branches are growing weird directions. Is this just because the new growth is making it heavy, does it need more water or maybe it needs reppotted? Any tips and advice would be great!
Hiya,
So I live in Christchurch,New Zealand but grew up in Cali for a number of years with monstera’s all around me.
They are a bit rare here (cold!) but I have finally aquired one again but it has been stuck in a way to small pot and is really tall.
Can I propagate to try and start over and grow wide?
Thank you
HI Sammi, I would just repot it! Break up some of the roots and replant loosely in a pot a couple sizes bigger. I would repot first, then once he is acclimated to his new house, you should be able to propagate.
Hi,
I have a monstera growing vertically with single thick stem. The stem is almost 2″ in diameter. There are a lot of aerial roots and 4 big leaves on the top. I want to cut that stem short and replant the monstera but am scared of killing it. Also, since it os growing vertically, I do not see the nods like the one your Monty has. Please help!
Hi Parul, I would wait. Your monstera sounds a bit too young to propagate, usually you need a few stems on a plant or else you may end up doing some damage and it may not recover. I’d wait 6 months or so until more stems appear. If placed in a bright location, monsteras grow very quick!
Thank you so much! Propagating Mona my Monstera for the first time using your technique. Fingers crossed!
Good luck Adrienne!
In dividing up my monstera, I ended up with some roots. Roots not attached to stem or leaves. Will monstera grow back from roots only??
There’s no harm in trying, Robert. I would let the roots sit in a glass water jar and just see if something happens. If the roots get moldy or start to disintegrate, I’d say get rid of them after that.
Hi, I thought the point of air-layering was so that it could grow roots while on the main plant, and then you would clip it off once the cutting had roots?
Hi Jackson, the method I describe is considered a type of air layering, but yes, the method you mention definitely is. You can try to propagate on the plant itself, but I haven’t had luck that way.
Hi Anastasia, refreshing to find your page on these beautiful plants. What I am wondering is is there a way to prune them so that they get more bushy and the stems then produce even more leaves lower on the plant?
Hi Jim! The only way (I believe) they’ll get bushier is with more stems, and more stems are produced by ideal conditions such as bright light and high humidity, and rotating them weekly – that encourages even growth all round. You can also do trial and error and see if pruning many of the tall leaves results in more lower leaves, but you run the risk of stunting growth. I hope that helps!
Great article, I’m just wondering if you use rooting hormone?
Hi! I *love* your advice–I live in South Africa, which loves its Monsteras, and my boyfriend’s got a huge one mysteriously growing up and around the stem of a giant jacaranda tree. The tree’s growing out of the driveway, and it doesn’t get a lot of water *and* is in a generally unloved area, so I’d love to propagate it! A couple Qs, though: 1) can the Monstera be put outdoors? We have coldish (0 F), dry winters and dryish summers, and it can get really hot in the sun. Then, 2) As it’s grown into the tree, this Monstera’s root system is pretty strange! Two branches have what look like nearly a DOZEN aerial roots, and another has one giant aerial root, but it’s partly embedded in the tree, and I’m worried I’ll kill it if I slice into it. I’d love to post a pic, but I don’t see an option on the site! Thanks so much.
Hi Eve! That’s amazing! To answer your questions: 1) Monsteras are topical and will die below 40 degrees Fahrenheit, so I recommend putting outdoors in spring/summer/fall and bringing in during winter only. 2)You should be fine, as it sounds like a very mature and healthy plant. I would love to see pics! Feel free to post them on leafandpaw’s facebook page and I’d be happy to offer more help!
Hi, I recently got my hands on 2 fairly unhealthy variegated monstera plants. They’d been outdoors and neglected (in a bad way) and trimmed without care etc. I have them now in soil because they do have a big woody root system going even though the plants look terrible. I’m so scared they’re gonna die! ? I’ve found no great advice from my local nurseries. Is there any chance I could send you some pictures of these babies and you could give me advice? I’d happily trade for a cutting or a propagated baby if/when we get to that point!
Hi Dana! Sorry for the late response. Yes, you can send photos (to my facebook page or L&P email), which will help me help you on what to do next. In the meantime, keep them in bright light and the soil lightly moist. Don’t do any extra trimming or pruning until a few weeks have gone by so they can get accustomed to their (much better) home. Hopefully I can help you out – and yes, I’d love a cutting! <3
Hi, thanks for a great article! I have a monstera with several stems and is growing all kinds of new leaves. How do I know where to cut off the leaf if I cannot see many arial roots?
Hi Lauren – thanks for reading! Your Monstera sounds very healthy and with that many leaves you should see some nodes along the stems and you’ll want to cut right below the node. Feel free to send photos to L&P’s Facebook page of you need more help!
Hello ?
I have Monstera growing in abundance outside can I try propagate this or are there different types of Monty’s (indoor/outdoor)?
Thank you
Jo.
Hi Jo – there’s only one type of Monstera and they can be grown indoors or out. I know they grow much more rapidly outside and you can definitely try propagating. Just make sure to pick a nice healthy chunk. Good luck!
I cut a stem from my sisters plant while visiting and put it in water hoping to get roots. It did not have a node. Just a leaf and stem. Will this work. She lives far away and I will not be able to do it again. Bummer if I did it wrong. Once I got it home I mixed up some root starter and placed it in that for a few days then switched it to fresh water. It has been 10 days. It isn’t dying but it isn’t getting roots either. Honestly I’m not sure what the plant is but by looking at pictures on the internet I’m pretty sure it’s a monstera. I would send a picture to your e mail but I don’t see how to attach from here and I don’t use facebook so I can’t send one there. Anyway, I am hoping you can help. Sorry this is so long. I tend to rattle on. Thank you
Debbie
Hi Debbie – you won’t be able to propagate from just a leaf and stem. The cutting will stay green/alive in a jar with water (like a florist’s cutting), but won’t sprout roots. You may have to get another cutting, this time with a little node or chunk or root which will then continue to grow. I hope that helps!
I’ve been thinking about propagating my monstera but I wonder – what will happen to the mother-plant? Will it stop growing at all and just stay the way it is after the cutting?
Nope, it does not hurt the mother plant at all, it actually helps! That’s as long as the mother plant is established enough first and healthy. The spot where you eventually do the cutting ends up producing and off-shoot stem, which then grow leaves.
Hi read Danas post about a variegated Monstera don’t know if this is appropriate or not, if you or her get any starts I would be interested in buying one. I’ve looked for this for awhile thank you Janette
Hi, I had a broken leaf in water for a while and it rooted so i put it in soil and now its going yellow! is it going to make it? should i take it out of the soil and out it back in water? please help!
Hi Margo, is the leaf going yellow or the stem? Leaves turning yellow isn’t uncommon in Monsteras, but if the stems are yellowing you make be overwatering or it may not be happy. I would place it back in some clean filtered water until you see new root growth and improvement.
Hi there,
I’ve managed to propagate a menstera and it’s doing well but there is only one leaf and it just grows bigger and badder but with no new leaves. Did I miss out on the aerial root? Will I just have one giant monsters leaf that continuously grows?
Hi Kait! As long as your Monstera isn’t dying or the leaves aren’t drying up/turning black, you should see some root form soon as long as there was a node. If there was no node, you may not have any luck. Photos might help the best for this, so feel free to send me pics on facebook!
Sorry that’s my right email below!
Hi Anastasia,
Thanks for a great article. My Monstera is very happy – 5 feet tall, huge leaves with 20 cuts, a new leaf every month lately – but only a single stem. He’s indoors in a huge northwest window. Any idea how I can encourage him to grow bushier?
Abby
Hi Abby! He does sound happy! To encourage wide growth like Monty you’ll want to do some trimming. I may need to see what the stem looks like, but you’ll want to at least cut a chunk off the top – this will encourage side growth. Plus you can propagate the cuttings. He won’t grow any way other than up unless he’s cut down. Hope that helps!
Hi, I’ve just repotted my Monstera that was quite a young plant that was originally a cutting, but I accidentally broke off trunk only leaving a small trunk stub and roots no leaves, do you think it will recover?
Hi Narelle, It should. I currently have a monstera adasonii with no leaves, just a trunk and a few roots. It is VERY slowly growing new leaves and is recovering. Give yours time and plant it in a high quality nutrient-rich soil, place in a bright sunny location, and be patient. Good luck!
Hello,
Can you tell me what is the plant with the purple leaves from the picture you posted above called? I have one, I adore it but I don’t know anything about it.
Thank you!
Hi Alina – that’s a tradescantia zebrina, or Wandering Jew. They’re very easy to grow and propagate well – and are safe for pets!
Hi Kate,
I have had one of these guys in my garden outside for over 2 years now it’s under the pagola and has shadcloth also but it starting growing sideways from the beginning and has never really taken off. Should I dig him out and put him in a pot? I would love to keep it in the garden and. Get it growing lush and thick thou. Thank you
Hi! Thank you for your great article! I actually got directions from tris article a few months ago in order to propagate my monstera. It worked beautifully! The parent was getting wild-looking due to the stems spreading and the new leaves shooting up in all sorts of directions and then the leaves started getting really small! So I decided to take cutting to condense the parent and also to get more plants.
As I said the propagation part was easy as pie! However…. the new leaves are also small. Like the parent plant the new leaves are smaller than the old leaves. Any way to get the leaves bigger? It’s indoor and I have one of those purple grow lights on it to supplement the nirthern facing window light.
Thanks so much for everything!!!!
Hi Elizabeth! So happy it helped you out. The leaves will be small for a bit until the cutting becomes established. If it helps, Monty Jr is about 14 months old and is just starting to get bigger leaves with small holes. It takes some time, but you’ll see them soon!
Thanks for sharing, I recently got one and the leaves (young leaves) are turning yellow while the big ones are getting brown spots. any ideas as to what I’m doing wrong?
Hi Natalia, it could be a few things, but it sounds like improper watering. Monsteras like to dry out between waterings, so the best thing to do now is check and see if the soil is moist/wet. If so, let it dry out and make note of how many days pass until it’s dry. Then water, and repeat this process for a few weeks until you get the hang of its watering schedule. Trim off any yellow leaves. Also check for bugs on the leaves and stems. This pest blog post might help. Good luck!
Thank you – I am about to nervy attempt this x
Good luck, Meg! Let me know how it turns out. 🙂
Thanks for the great information on Monstera propagation!
I also wanted to add to your comment about the wandering Jew plant. I believe it is toxic to pets.
Hi Darci, Thanks! And I know wandering jews can be considered toxic, but I reached out to Cornell University and they confirmed it is safe for pets, it just can’t be consumed in excess. But really, no plant should be. 🙂
you love your plants and your explanation is great..love from
Thank you Clare!
This article is so helpful! I’m wondering if I’ll be able to propagate a leaf that came off while I was repotting my monstera today? It’s really struggling and only had 3 leaves despite being 2 years old and I’ve place the broken off leave stem in water, but there is no node. What do you think of my odds for success?
Hi Maura, You won’t be able to propagate it, but it will look lovely in a vase for a few weeks! You’ll only be able to propagate with a pre-existing node/roots.
Hi! Thanks for this article! A friend gave me a monstera cutting on Christmas. I’ve been letting it sit in water since then and have some new roots! But also two leaves are starting to yellow. What should I do?! It’s winter so I wasn’t sure if it was a good time to pot. The new roots are about a half an inch. Thanksss!
Hi Alexandra, how many leaves are on the cutting? Sometimes it’s common to see a few turn yellow. I would still let the plant sit in water another month or so, and you want to be sure it’s not near any drafty windows or cold temperatures, which may actually be the cause of the leaves coloring. By February, you should be able to replant, just be sure the cutting is in a warm place with lots of humidity (you may need humidifier as winter is drying).
@Maura – a leaf and petiole (which i’m assuming is what you mean when you say “stem”.. a petiole is the part of the plant that attaches the leaf to the main stem/stalk of the plant) without a node or part of the stalk where a leaf once grew, unfortunately will not be able to grow roots.
For those asking about toxicity with pets – aroids are much less toxic than many websites have led people to believe.. the calcium occalate crystals in monstera and other aroids can indeed cause discomfort in the mouth of animals/humans and could possibly make them throw up if they ate/digested a significant amount but they would have to actually consume almost an entire plant, not just chew on it, for it to cause any serious problems.. and like I said before, the crystals cause discomfort in the mouth and do not taste good, so your pet would have to be massochistic to continue munching on a plant that wasn’t tastey and made their mouth hurt. My cat chewed on a leaf of my monstera once.. and she hasn’t chewed on another plant in th house since.. and I am an avid aroid lover and am always on the hunt for plants to add to my collection, so I have aroids absolutely everywhere in my apartment. But ever since she chewed on that one leaf, I never have to worry about her when she naps behind my plants or hits one with her paw to watch it move, because although my cat likes to bite absolutely everything, she has never tried to bite one of my plants again.
Those asking about moss poles vs plain wood/plastic stakes – yes, moss poles actually do make a significant difference! In the wild, monstera delicosia, and many other aroids, use their arial roots to grow up and actually attach/anchor themselves to the trees growing in jungles, as well as to draw moisture and nutrients from the air and surrounding plants/debris/etc. While both a moss pole and a plain wooden stake will give the plant a support to grow vertically (and as monsteras grow vertically their leaves get larger and with more holes), unlike a plain wooden stake, a moss pole gives your potted plant something soft for its arial roots to grow into and actually attach to as well as supplying moisture/nutrients to the roots once they start
Thanks so much ? I have s Monty that’s so healthy but getting out of control but was terrified to try propagating. I’ll def give it a go now.
Good luck Bridget!
Wow, I love your blog! I was wondering if I could use Spanish moss in lieu of Sphagnum moss. What do you think?
Thanks Nicolas! They are not quite the same thing as they come from different plant families. Spanish moss is part of the air plant family and will not hold moisture or function like sphagnum moss (which is an actual moss) will. You can definitely try it, but it is definitely not a direct replacement and may not work.
Where and how can I find cuttings to propagate on my own? Having so much trouble finding a local nursery or garden that sells the cuttings
Hi Kossondra, Depending on where you live, you can purchase a Monstera online (Amazon had them here) and have it shipped to you. I know a lot of people have trouble finding Monsteras, so I often recommend just purchasing a small or medium-size plant over the internet to get them started. Also, you can try asking those local nurseries if there is a way to order one for you, usually they buy bulk plants from a larger tropics company who will sell them. Hope that helps!
You might want to take a look at your air layering technique. Air layering is done on stems still connected to the plant, you shouldn’t cut an air layer cutting until the roots completely form. Just wrap the moss around the stem and cover in plastic and leave. It should finish in just about a month.
Hi Tyler, I do specify that air layering needs to be done on the plant itself until roots form, but I appreciate your feedback!
Thanks so much for this post! I got a cutting about two months ago and put it in the jar per your instructions. It’s so happy and roots are coming out everywhere! The new roots are about 1.5 inches long now and I feel like it’s time to put into a pot. I’m a little nervous about it though. Can you give some more instructions about potting? It looks like you used a post to keep the plant upright? How frequently should I be watering after it gets moved to the pot? I don’t want to ruin the little beauty!
Congrats Megan! You can definitely pot now, but it never hurts to keep him in water until a longer root forms, I think Monty Jr.’s were about 4″ long when I planted. As far as planting, I potted him in clean moist soil (see the shop page for the soil I like to use) and I used whatever I could to keep him upright – like a stick and twist ties. Watering depends on lighting and current season, so I would keep him in bright light and start watering once a week but check the soil every day. You want moist but not dry or sopping soil. Hope that helps!
thanks for the great instructions. This spring I will propagate from a 40 year old Monstera that has been growing in my living room, having regrown 20 years ago after being cut down to the soil level. Now is 8 feet tall and a little wild despite regular prunings. In order to get a full looking plant, should I plant 2 or three separate cuttings in one pot (after rooted in water for a few months,) or should I rather limit the planting to one cutting per pot?
Hi Terry, 40 years old? That’s amazing! For grouping plants, it depends on how big the cuttings are. Considering it seems like the Mother plant is a large Monstera, I would keep each cutting to one pot each. They just tend to grow better by themselves, plus Monsteras do grow quick! Good luck!
Hi! Should the cuttings get the same amount of light as the parent Monstera, or more / less? Mine has been doing beautifully in my living room, and I’m having a similar problem to you! I’d like to have two cuttings to trim it back and give away to friends and trying to figure out the best way to do that.
Hi Adelaide! I kept my new cuttings (both in the water vase and after I planted them in soil a few months later) in a warm bright location which definitely helps with roots growth and development. Mine are in an east window so they get a decent amount of sunlight a day. Hope that helps!
How do you know what size pot to use? I bought a cutting and it is doing good. It has 3 roots growing off if it. It has been I water for about 2 months is it time to pot it?
It depends on the size of the cutting and roots generally, Shannon. With three new roots, I’m thinking a 6″ pot should be good and yes, after 2 months it should be ok to pot up!
Does you cat try to eat your monstera? I read that they are toxic. I have a cat that enjoys chewing on my plants, and am concerned about his taste for greenery as I introduce new species into the household. How do you deal with that?
Hi Diane, I do not have problems with my cats eating any toxic plants including my Monstera, which is why I have (slowly) incorporated them into my collection. If you have cat who does like eating plants, I would stick with pet-safe plants only.
Thanks for the great post!
Unlike most monsteras I see, mine only has two stems.. it has one quite long stem with loads of petioles along the length of it, making it look pretty awkward. So when guides tell me to “find a stem” – well. Is it okay to propagate taking the top node (which has two petioles with leaves) of the main stem? It would be leaving the mother plant looking a bit weird, I’m sure, but hopefully it will keep growing.
I suspect my plant might not be getting enough light, triggering the weird growth pattern (it’s been reaching out vertically), but I’m trying to correct that.
Hi Julie! Yes, that it totally ok. It will continue to grow and might look funny for a while, but it will fill out eventually. Monty has a similar issue at this point as well and I’m just planning on taking the top set of petioles too. Monsteras really do like lots of light (contrary to what a lot of other sites say) and they do do best when turned every month or so too. Good luck! Feel free to reach out on facebook if you need help or want to send pics. 🙂
Hi, After reading your post on Wednesday I decided I was smart enough to take a cutting from a monstera in my office. I was wrong apparently. I did not take any of the stem where the leaves were branching off, however I did take an aerial root and a node. In your experience, do you think I could still see results?
Thanks! I really appreciate it!
Hi Alison! You should still be fine. As long as there is some kind of root/node and a petiole/leaf, you should be ok. I would place that guy in water for a while though, you’ll want to see nice root development before you plant.
Hi! Thank you for this post! I recently tried to propagate a cutting from a monstera and it was super happy when in a jar of water. When I potted him he got really droopy and sad and seems to be turning a lighter color. Is it too late to save him? Do you have any advice?
Hi Alex, usually a lighter color means there is a watering issue. Does the soil have drainage? Is it overwatered? Make sure your cutting is in a bright location without direct sun, and also some place warm. Also I would check for bugs as new cuttings are very prone to bugs. Feel free to send a photo to L&P’s facebook page for more help!
Hi!
I’m so terrified of propagating my plant but your post made me want to try. But what happens to the mother plant (Monty)? I have a plant where there is only two places where new leaves grow so I’m afraid that then I propagate it will now only have one place where new leaves will grow.
Hi Marie! I suggest not propagating unless you have multiple steams that have multiple leaves, not waiting until you have a few stems may result in killing the plant. Without seeing photos I can’t be sure, but I’m thinking you may need to wait a bit longer. Feel free to send photos to my FB page and I’m happy to take a look!
Hi!! Thank you for this wonderful post!! I’ve successfully propagated several (yay!). Does pruning encourage a bushier/more full momma plant? Mine is just starting to look a little stemmy, but still really nice, so I only want to cut if it will help maintain its full shape. Thanks for your advice!
Hi Jen! Thanks for reading and congrats! Yes, pruning does encourage more growth and depending on where you prune you may end up with a more compact plant, but it really depends on where you take the cuttings. It sounds like you have the hang of it though! 🙂
Hi!! My monstera water propagation roots habe suddenly turned brown!! Do you know what it means and what i can do to save the plant? Id hate to lose it 🙁
Hi Payton, the roots do turn brown naturally as the plant matures in water, so you should be ok! However, if they are mushy or smell bad, that means the plant is dying. Be sure you change the water every 1- days, too.
Hi!
I want to use your picture under “Snip the Stem” for my gardening column for the Jacksonville Times-Union paper. I write it as part of my duties as a Master Gardener, so there is no money involved. Thanks!
Hi Karl! Feel free to use photo but please credit it back to leafandpaw.com, stated somewhere visible. Thank you for asking and sharing!
I have two Monstera plants that I got when we closed an office and someone left the plant behind. It was one long ‘vine’ with a few leaves here and there. So we cut it up into 4 plants and rooted them and they took off. I have two and my friend kept two. I have both of mine at work and they both get a lot of indirect bright light from a south facing window. They are not in the window but near it. One of them seems to be growing one long stem that is bending and twisting and I clearly need to create some kind of support if I keep it like this. In most of the pictures I see of Monsteras the plant looks to be growing up as more of a bushy plant, vs this one that has one long stem with leaves coming off of it in many spots. If I want a more bushy version vs one that will need to be staked in order to keep it from laying across my desk, will cutting the stem back cause the mother plant to produce more than one new branch? I hope this makes sense 😉
Hi Michelle! It does – and cutting back will help it produce another branch, just be sure not to cut it if it’s too young. From your description it sounds like it will be fine to propagate. I know some people also plant a couple smaller monsteras in one pot to give an illusion of a larger plant. I hope that helps!
I have 2 roots that are outside the plant about 1 1/2” long what should I do with them?
Hi Mary Ann! Those are their aerial roots, which are what the Monstera uses to grab onto trees in nature. As an indoor plant they don’t really do much but I don’t like to cut them off. Instead you can gently plant them in the soil – that will help the plant get extra water and nutrients.
I meant 12 1/2” long! Two roots!
I really need some advice ?. I got a clipping of a monstera plant, it’s nodes are soooo long. And i didn’t know if I should plant it right in soil or put in water? I have it in water right now. But I don’t know ! First monstera btw!
Hi Jessi! You probably can plant right in soil, but if it were me I would let it sit in water for a while to grow some new roots. You should see some pure white roots sprouting from the older ones, and that’s a good sign. I’d give him a month or so in water, then you should be able to plant him in soil (be sure to use a high quality garden soil). Good luck!
Thanks for sharing! I got cuttings from the plant store, kept them in water until the roots came out and potted. It’s been 2 months now and there are no new leaves. Do you know how long it would take for a new leaf to grow once the cutting is potted?
Thank you!
You’re welcome Anna! It does take some time on these new plants, usually a few months. Keep them in a humid and bright location and they should show a new leaf in 2-4 months after planting. After they start to get bigger, leaves seem to pop out faster. 🙂
Hello Monty’s mom. I went to the hospital for a very long time and all my plants died. I had 6 members of the Monstera family. Where can I find rooted cuttings that don’t cost me a arm and 2 legs? PLEASE HELP!!
Hi Sharon, I’m so sorry! It depends which monstera varieties you are looking for and where you live. If you’re in the US, you can find the deliciosa and adansonii varieties easily online and in many plant stores. The rarer varieties (such as the variegated deliciosa) are still expensive and hard to come by. I’m happy to send you some suggestions!
Hi there. I’m in need of some advise too. I bought a medium sized Monstera, with one main stem and several leaves coming off it. The stem is supported around a coconut fiber pole. My plant was doing really well and kept growing new leaves out of its topmost/youngest leave. Unfortunately, my new puppy found a liking to the plant and decided to eat the three youngest leaves off the plant. This is now a few months back but my Monstera hasn’t grown any more leaves since then. I’m wondering if my plant will start to shoot new leaves from the stem, or will a new leave grow from one of the older leaves? It hasn’t done anything in months now and I’m wondering if it has given up altogether?
Thank you
Hi Gisela – first, be sure to monitor your dog for future plant consumption as monsteras are considered toxic to pets and can cause intestinal issues. As far as new leaves, monsteras pump out leaves slower is they have less pre-existing leaves, so I would expect to see a new one soon, but it will probably take time. Move the plant to a nice bright location and add a little fertilizer to give him a boost. He just needs some time to recover but should bounce back soon! The biggest thing he’ll need is time.
Hi, I’m sitting here in tears, drowning my guilt with a glass of wine after cutting “Groot” while my mom continues to laugh at me for being a wimp.*parents* sigh. Thanks for the helpful info. I hope he’s ok. I’ll be on the lookout for new roots.. I live in a small place so I have to control his size. I will give baby Groot to a friend if all goes well.
I hope so too! Roots take 2-4 months to develop so the hardest thing to do is to be patient!
This might sound weird, but the roots are really growing quickly in the water. There are already about 5-6 small roots shooting out and they are already over an inch long. The aerial root in the water hasn’t made new roots but it’s still growing. The plant I cut has suddenly gone crazy and I am literally watching it grow an inch a week. The roots are no longer in the dirt and it looks like it’s trying to climb out of the pot which is somewhat creeping me out. Maybe I should just replant and be done with it. They must really like the humidity! Thanks again.
Monty is beautiful! I adopted my Charlie as he was unwanted.
He is huge now and looks happy.
Thank you! And I’m glad Charlie found a loving home. 🙂
Do you know if a monstera cutting can remain in water and just live in a vase? I made a cutting of my main monstera plant on July 2. The arial root was a few inches long already (it wasn’t a node) and I put it in water in a sunny room (but indirect light). Then I went out of town for 18 days. When I got back, the root is much longer, plus another root has formed, plus a million of the tiny white roots are coming off the original root, PLUS a new leaf is unfurling. There were just two stems/leaves and the one root originally. So, it seems to be happy. And it looks beautiful where it is in the vase. But I don’t know if this is an appropriate living environment for a monstera. Please advise!
Hi Bunny! It can, but it will be a lot happier in soil in the end. I had a cutting in water for about 6 months and the leaves grew very slowly but the roots blew up. I had to move it to soil and it popped out leaves immediately. So, you can definitely keep it in water and they don’t mind it, but you’ll probably have to transplant it once the roots start to get massive.
Hi there! I just started my first propagation journey just over a month ago. 2 monstera cuttings and into the water they went. To my HORROR, one of the aerial roots snapped off while I was putting one into the jar. I thought he would die right off. But flash forward to today and both cuttings are thriving! They are developing new roots, but they’re thick almost like the aerial roots. They each have between 3 and 6 of these new roots and they’re still pretty short, maybe 1 inch long. My question is, how do I know when the cuttings are rooted enough to be transferred to soil? I don’t want to let them sit too long, especially with it almost being the fall. But I don’t want to pot them before they’re ready and risk killing them! What should the roots look like when it’s ready to be potted?
Hi Kaylee! Congrats! They sound almost ready. I would repot them at the end of August, and since September tends to be warm (in the States anyway), that will give the some time to acclimate. There should be at least 5 chubby white roots. Be warned, because you are entering fall you may not see a huge amount of leaf development once you plant, but don’t panic, baby monsteras produce leaves very slowly. But they do sound healthy and almost ready to pot, you should have nice healthy plants!
Looks like large scorch marks on leaves. Moved plant thinking maybe it got a hot shot of sun, now omg. Some leaves turning yellow now. Surprised if I have 4 leafs left. This is very sad, my 1st time. Help please, maybe hopefully.Thank you
Hi Joy, monsteras do not like harsh, direct sunlight so that can definitely be the problem. Don’t cut to many damaged leaves off, but if some are yellow/dying/destroyed those can be cut. You can definitely save your plant, just keep it in medium sun to recover, away from drafts. They also like high humidity. I hope that helps!
Hi Leaf and Paw!
I have 2 Monstera Cutting from my friend. But included Fruit and New Leaf. Would you mind to help me to propagated them? My another cutting Monstera I put in water last month was died after a week and I do not know why even he had an air root, I put in a little
bit dark room… Does it need to put in a full indirect light room to grow root?
Hi John, yes. Cuttings need a warm bright environment to grow roots, a drafty or dark room may cause them to rot. Make sure the water is clean and the cutting includes a healthy root, then place it in a bright room that receives day sun. In a month or two you should start to see some roots. Good luck!
I guess they’re not toxic to cats? Can this plant be propagated by a cut off leaf and put in water?
Hi Branka!
-All philodendrons are toxic, but I have not had any worries about my cats eating them. If you have plant munchers, keep monsteras out of reach.
-A single leaf without a node or root will not propagate, the cutting must have a pre-existing root/node in order to grow more. If it is just a stem it will look nice in water in a vase, but it will not grow roots.
Hi! I’m so glad I found your blog (thanks, creepy Google search engines tracking everything I do) because I want to propagate my Monstera but all of the stems seem to be coming from the dirt/root level. Nothing is growing off of anything else, but I’ve been getting new leaves like crazy this summer! Can I propagate from down low like that? Does my description make sense? Should I just try to air layer to make it more bushy?
can I propagate from a stem and node or do I need a leaf?
Hi Catie, I’ve heard it can work, but it takes a very long time, much longer than if a leaf were attached. Putting the stem and node in water in a sunny spot will give it the best chance to root, and you should see 5-10 small roots before you plant. Hope that helps!
Hi!! Thanks for a really great post. My cutting has been in water less than a month (not long enough?) but lots of aerial roots popping out and starting to fill the glass jar. Is it a good idea to leave the cutting in longer? I read somewhere I should expect spindly white roots to form out of the stem where it was cut but I don’t know if that’s true. Thanks for any advice!
Hi Emma! Yes, those white roots are a good sign. I usually give it at least a month, so you can wait a bit longer or move to a bigger jar for another few weeks. Either way it sounds like a healthy little guy!
I purchased a stem cutting that was very small, about an inch. It arrived in great shape, stem was round, no leafs on stem, just stem but fully rooted. Now the stem is shrinking, but the roots are still healthy looking and the aerial root that is attached to the stem is still solid, not mushy at all. It is a week today. I’m guessing I did not water enough, if the stem dies I guess there is no way that a new leaf eye will appear any where on the root system, correct?
Hi Laurie! It depends. Cuttings with no leaves take a VERY long time to produce one, so they key is to keep the cutting humid and in a warm sunny place. I would water once a week and keep it in these conditions – if the stem dies there is still a chance of survival, but it is very dependent on how well you care for it. Cuttings like this are very delicate. Cuttings with leaves are much more stable. Good luck!
Thanks for a helpful post. I have 3 truly monstrous sized outdoor cuttings from a 25 year old “Monty”. The trunks are 6″ across and each one weighs about 20lbs. I have them in potting soil in bright filtered light on my patio. They are so big that I had to plant them in 5 gal paint buckets. They are 2.5 weeks into the process. New leaves have unfurled at the tips, all old leaf branches that were trimmed are dying off and leaving giant bull’s eyes on the trunks. Each has several air roots. Where will the roots come from? These cuttings are so huge that nothing looks familiar to your photos. Any suggestions will help greatly. Thank you.
Hi Barbara – I would love to see a photo! Your monsteras sound amazing. Because of their age and size, they should be putting out aerial roots that will help anchor them into the ground. I notice as Monty becomes older, more aerial roots form rater than in-ground roots. I hope that helps and feel free to send a photo to L&P’s facebook – that might help me get a better idea too.
Hi!
I’m propagating a Monsterra from a single node with a leaf but the leaf seems to be slowly dying off. Is this a problem or will it survive on its own? There is some sprouting and a devemoping root at the node.
Thanks for the article!
Hi! He should survive, but leaf growth will be very slow, so patience is a must. Keep the cutting in a humid and warm/sunny environment and he should be fine. Don’t overwater either, just keep the soil moist. Seeing any root development is a good sign. Good luck!
Thanks for this article. Our Stella Monster has come through a ‘grooming'(via cat) and now is onto her second grooming(via your method). I am sure she will be fine.
I have 2 small leaves and a few long white roots, propagated in water. If I move it to soil how wet do i keep it and is a West or East window (1 ft from the window) best?
Hi Barbara! As long as he is not getting harsh sunlight, he will be fine. Monsteras do like a decent amount of sun, but not drafts. As far as watering, keep him lightly moist but not soggy. I recommend getting a moisture meter so you don’t overwater, which can kill a young plant. Good luck!
Hi there, thanks for the article. I’m going to propagate my monstera. The aerial root by the node where I want to make a cut is rather long. Will the cutting root if I snip off a bit of the aerial root to fit it in a glass jar? Thanks.
Hi Max, It will still be fine. Monstera roots are pretty pliable, you should be able to just twist it a bit to fit in a propagation vessel, that’s what I did on mine anyway since I didn’t want to cut anything off.
Thanks for the informative article. I tried my first monstera cutting just yesterday. Will a new stem regrow from site where I took the cutting?
It will! It won’t grow in the same spot as where the cutting took place but will grow as an offshoot of the same stem.
Thanks for the Great Information.
I am trying to REVIVE MY BABY. Early in the year in March I started with this plant that was dead and kicked around in a yard for 2 yrs and I took off and grew greeeeeat.
Once I moved it in the home I think beginning of summer it was big enough for a Large planter. Silly me filled the whole thing up with dirt to put my baby in. I felt it was sitting to high. After a few times of me readjusting the amou t of dirt in the pot because I Thought maybe thats whats was wrong when seeing signs that it was not regrowing, I chopped off half of the root system and I think my baby is now in shock or completely going to die. From the large plant I was able to break it down to five individual pots now. Trying to save or revive any that I can. With these tiny strings of roots that are now left after everything else has died off. TELL ME THERE IS STILL HOPE FOR THEM. what do I do. It is now winter I’m in Southern California so we are still getting Some good heat should I let them get direct sunlight. I’m stuck here
Hi! Yes, it is probably shocked amongst other things. Too-large pots are very dangerous, leading to over-watering and general unpleasantness since Monsteras prefer to have many of their root aerial, not smothered under soil. Either way you should be able to save the pieces you have. I would let each of those cuttings sit in water for a good three months to develop roots, then, you can reassess and plant them if you see enough development. Keep out of direct sunlight, and place in a medium lit, warm spot away from all drafts. Good luck!
Hello,
I’m in desperate need of help. I purchased a partially rooted Variegated Monstera (Leaf, node and aerial root) and when it arrived the roots that were growing from the aerial root were mush and came off. The aerial root itself looks questionable but I did cut the tip and noticed that it is still white. I soaked it in a 50/50 Peroxide/water mix for 20 minutes, let it air dry then soaked in Superthrive as per the directions. I put it in damp sphagnum moss in a ziplock bag. Any suggestions? Will it live? I wish I could attach a picture.
Hi Gigi, Yes feel free to shoot me a photo on Insta or facebook, but you should be ok. As long as that last remaining root/node is white and not black or mushy it should survive. I would place it in water actually instead of moss at this point, in a clear jar, so you can monitor and watch root development. Good luck!
Hello,
I have succeed in propagating my monstera last year. Can I propagate it again on the same spot? or I should go above or below the previously cut stem (stem with node) ? The same spot has 3 arial root already, so I think it wold be good to propagate there. thanks.
Hi Lani, You can propagate it again in the same spot or on the old stem, just be sure the existing root or node is healthy and plump and there are at least three leaves that will be on the new cutting. A cutting without any leaves does not have a high chance of survival. Good luck!
Very interesting article. We’re lucky enough to be able to grow monsteras outside in Northland, NZ. We have several monsteras around our garden but your advice will be useful should we need more. We just acquired a set of corten steel monstera leaves as a garden sculpture. Very cool in a garden that includes the real thing!
Hi,
This article is golden! Your story telling is brilliant and had me laughing and learning at the same time. <3
Aw, thank you Ada!
hi there, what happens at the cutting spot on the old plant? Are they like Pothos where they grow a new “branch” right at the node before the cut? I am a new Monstera mom and have one that’s too young to propagate. I’m just trying to learn ahead. Thanks!
Yes, that’s exactly what happens. The original cutting area stays healthy and sprouts a new branch which helps keeps the plant looking full. I would definitely wait until you have a large-ish plant before you start propagating.
Hey, I have a monstera that has a stem but no leaf. The stem is growing and growing. Should I cut it off or will a new leaf ever grow back? The tip is a bit brown where the leaf was. What should I do with this stem? Thanks!
Hi Ana, a new leaf should grow out of it, despite the tip being brown. If your monstera has lots of other leaves, you will be fine cutting it off, but I would leave it and let it grow if it’s a younger plant.
Hello! Thanks for your post, I am trying to learn about how to help my monstera fill out. I have had it for a couple of years but it only has five leaves, as each time it grows a leaf the oldest leaf yellows and dies. Do monsteras only grow one leaf at a time or is there a way to encourage more growth? (Ie, like propagating as you’ve shown)
Thank you
Hi Krysten! Smaller/younger monsteras grow very slow, so it makes sense that only one leaf is appearing at a time. As they mature I found they grow much quicker. It’s not however, common for an older leaf to yellow as a new one grows, so you may have an overwatering issue. Keeping monsteras in a warm, sunny location promotes growth the most and be sure not to overwinter in winter. I hope that helps!
Hi! I recently planted a well-rooted leaf (approx 2 months ago). All seemed well until about 2 weeks ago, the leaf started to yellow. Any thoughts?
Hi Cayce, Young monsteras are very susceptible to overwatering, so be sure you aren’t watering too often, that’s usually what causes leaves to yellow. How many leaves are on it?
Hi. I have this well rooted cutting ready to put into the soil. but the stem which it is propagated from is very big. ( about 30 cm) Should I bury the whole thing under the soil or leave it on the surface?
Hi – thank you so much for this blog post! Definitely the most reassuring and easiest to follow. I have never propagated a monsterra before and I am a little nervous… I have one branch growing out quite rapidly but it already has quite long roots.. almost a foot, which seems a little difficult to put in a jar with water. Is it possible to directly place into a new pot and potting mixture? Thanks!
Hi Esther! Thank you! You can just place into soil or you can trim the roots and place it into water. Cutting these long roots is fine, but you may want some chubbier stable roots to grow, so, personally, I’d trim roots and plop in water for awhile. New roots will be white. 🙂
I’m new to monsteras and ignorantly bought a cutting with root rot. I cut all the mushy roots , brushed it with soap and water, then hydrogen peroxide, put it back in filtered water. I read somewhere that cinnamon is a rooting agent so I dropped a stick of it in the water. After a week a lot of white spots appeared on the remaining roots. It’s been a couple of weeks and I’m happy to say that the new roots are from 1 – 3 inches long. They grow fast. I’m concerned that the root tips are white and gets darker towards the base. Is that normal or is root rot setting in again or is it the cinnamon discolouring it.? Roots are still growing though. Should I transplant it in soil or wait longer?
I have never heard of cinnamon as a growth enhancer! That coloring could be normal, new roots are typically white but it’s probably not root rot. A gentle pinch of the roots will tell you though – roots will squish immediately. If they feel plump and firm you should be good. Typically you want a cutting to sit in water for a few months, so if it’s been that long and the roots look healthy, go for it!
Hey thanks for the post – what happens to the mother plant and the stump that is left, does it regrow?
It does, an offshoot will spurt out of the same branch, just not directly out of the cut area.
I love Monsteras, too! So much for outlining this so clearly, can’t wait to do mine, which appears to be a distant cousin of Monte’s…
I love your cat! You should be aware though, that all philodendrons are very poisonous to cats. If your cat shows any interest in playing with or chewing it, you need to put it up higher. Mine have ignored mine so far, thank goodness!
Happy growing!
Lisa
Hi thanks for the post. Sounds just like my crazy cheese plant who is also taking over my living room, I want to snip off a leaf (a friend bit the end off, don’t ask) so it’s half a brown leaf now, if I’m not planning to propagate does it matter where I just the stem?
It doesn’t technically, Bobbie, I would just cut any leaves off as close to the base of that stem as possible, if that makes sense.
I’ve had my monstera cuttings in water for a few weeks now. They are starting to grow roots, but simultaneously the leaves are starting to yellow. What should I do/what’s going wrong? I did this years ago and that never happened. I have lots of options for sunlight so I can move it if it helps.
Hi Sarah, This can happen if the cutting was from an older monstera or if the water it’s in is heavily chlorinated. Lighting can be an issue, I always keep cuttings in bright indirect light and at a warm temperature. If it’s an older monstera the yellowing is normal, but there should be healthy growth starting. If it’s the water, I would suggest using rainwater and you should see an improvement.
I have just started trying this in water and the leaves are turning yellow on some. Can i cut thst leaf snd just have the roots with a base stump?
Hi Shannen, you can but it may take quite a while for new leaves to form. I would leave as much of the leaves as you can, but once they turn brown they should be cut off. Be sure the cutting is in a warm place in bright indirect light.
I took 3-5 foot plant from my club house pool. It is too big to stick in water. It has no roots. What do I do? Currently, I stuck it in a pot. Please assist. It is sooooo beautiful and I don’t want it to die.
Hi Jordana – what you can do is do the type of air layering I mention and put a bundle of moss around a node to encourage root development. Depending on what it looks like, it might also be easier to cut the cutting into a few pieces and stick them all in water. Good luck!
Could you post pictures of the air layering process?
I don’t have any from my process but this is a super great guide: https://www.instructables.com/id/Propagating-Plants-by-Air-Layering/
Monty the Monstrera is absolutely stunning! I’m looking to grow my monstrera rather wide than tall. Looking at Monty it looks like there’s a lot of different ‘stems’ in the same pot. Would you suggest to plant multiple propagations in one pot to create a super full plant? Or would I achieve this by pruning it to force new growth?
Thank you! This was a bit of both, but yes Monty has multiple stems which makes staking or using a moss pole difficult. I do have another monstera with two plants in it and they do just fine, they actually look fuller. Propagating may give you a bushier look but it’s totally depending of the monstera you have, but generally propagating almost ways helps force new growth.
I just cut my monstera plant only to realize it was already rooting into the soil. I pulled it out and continued woth my plan to put it in a jar with water. Now I am wondering if this was a bad idea. Any advise? Did I ruin it!?
Hi! It might not be over, I would just go ahead and propagate as you intended. If you cut in the right spot (with a node) you should be ok and it will grow new roots. If there is any stem on the original plant, I would leave it in the soil too, it may grow some leaves.
Hello!! Thank you so much for the blog !! I purchased a cutting with small nod about an inch or so it’s my first one to propagate! What soil would you recommend and size of the pot? Leaf is about 13cm in length it’s got another baby leaf coming. When do you add fertiliser and repotting it? Thank you!!
Hi Alise! Depends on the size of the cutting and the roots, but you want a pot that won’t squish the roots when it’s planted. I recommend general potting mix mixed equally with perlite and orchid bark. I would fertilize it in a few months once it’s acclimated to the pot. Good luck!
I would like to leave the monstera in the water permanently after I’ve successfully propagated. Would that work.? Thanks
Hi Cam, you can but eventually it will be happier in soil and the roots will get out of control in water. It will also grow quicker in soil.
Hey! I have a swis cheese plant too and I am currently propagating two more from that one. My question is why is my plant leaning towards one side? I saw that you plant did that too and so is there anything I should do?
Hi! Did Monty find his way to grow new leaves where you cut him?
I have a Monstera variegata I’m thinking about cutting down, but I don’t want to if it might stop it’s growth. Will it eventually bring new leaves where you cut it?
Yes it does! New leaves shoot off from the cut stem (usually horizontally), resulting in a bushier plant.
This is wonderful and gave me the courage to take on a variegated cutting which I was terrified I would kill. Fingers crossed it goes well!
Good luck!
Hello to Monty’s Mum! Thank you for such a comprehensive blog; I’ve learned so much! My monstera is in a 9″ square pot and has 4 growing stems, all wanting to branch out horizontally. I’ve tried a moss pole but it didn’t work as the stems were too far away from it. Now I’ve constructed a bamboo frame and am trying to get the stems more upright by stringing them to it with soft twine. Do you think it will damage any stems below the compost level by forcing it more upright over a period of time? I see you recommend putting cuttings in water before potting up. I cut off a fifth stem with one healthy root and two leaves and put it straight into a new pot with new compost. Hopefully that will work or should I have done the water thing first? I’ve cut off 5 leaves now,leaving at least 20 on the plant to help with the more upright habit. Do you have any advice please?
Hi Mary Ann! Aww thanks! Your monstera sounds very much like Monty and will never “grow” in a certain way even in you trim off leaves. You can definitely control him by tying him loosely to the bamboo frame (he’ll be fine, just be careful for new growth), or propagating is the best way to sculpt him into a more shrubby look since it allows (usually) horizontal growth to occur. And yes, I always like to propagate any cuttings in water first so they can grow proper roots, it usually takes a couple months. I hope that helps!
I am having a really hard time with my monstera cutting! The water turns brown after 1 or 2 days, I can’t keep up with changing it. I’m only using filtered water. And just now, I was rinsing the root gently and found that the outer layer had gone all soft. It slid right off, exposing the white root underneath… I left it off and put it back in the vase with more filtered water, but what the heck is happening and what am I doing wrong?
Hi Eugenia, Yeah that isn’t a good sign, it should not be turning any kind of brown, especially after only a few days. I can’t tell without pictures, but I’m thinking you have some kind of rot going on. You may want to give the cutting a clean trim and make sure only healthy stem remains. Also be sure the vase doesn’t have too much water – it should just cover the node. Feel free to send pics to my facebook page too!
I had my Monstera from 5 years ago as a small plant it grew bigger than I can handle, I separated in 3 smaller plants and they did very well.
Thank you for your observations!
I just brought a little monsterina cutting from work and looking forward to see what happens. They are so gorgeous plants and surely want to become their mommy!
Hello, my newest leaf on my monstera broke off and now not sure what to do. Please help
Hi! A new leaf should pop up in it’s place, but it may take time. Continue to keep it in a warm, sunny location.
Don’t root them in water unless you are going to grow it in water.
In which case you do your cutting, put it in a big vase. Fill the vase with rocks so the roots can anchor and then fill with water. It’ll grow just fine.
Put it straight into dirt with an air root and water the thing. it’ll grow.
Hi Carl, I find rooting in water then transferring into soil yields a healthy plant. You can also definitely continue to grow the Monstera in water, but eventually the roots will become too large and it will need to be transferred to soil.
Thanks so much for your informative post! Can you use a non glass, opaque container to regrow a cutting? I don’t have a transparent jar large enough. Tia!
Yes, you can! Opacity makes no difference, it’s just easier to see the roots when it’s clear.
Hello Please help.
I have had mine for days and it’s not happy, brown leaves and drooping. Should I water it a lot? My house is very hot as well. Your advice is much appreciated.
Sounds like he’s thirsty, and if your house is hot and not humid, he is probably very unhappy, hot and thirsty. Monsteras need some humidity or they will brown and wilt, no matter how much you water it. They prefer cooler temps. I would get a moisture meter to test for soil dryness and definitely move him to a cooler place if possible.
Hi there,
Thank you for your very informative article!
I noticed you put Monty Jr. into a not too large pot! Do Monstera’s not like to go into larger pots at first or is that just what you decided??
Hi Fern, I always choose a not-so-big pot so there is no chance of root rot. Placing any new plant or cutting in a too-large pot means there is too much soil and (usually) too much water which can rot the plant. Plus Monsteras do not mind being somewhat cozy in their pots.
hello.. l want to know why my leaf of Monstera hasnt any cutting shape ?how can l care my Monstera be like your one ..thanks
Hi Shayma, Monsteras develop holes as they mature, so if you have a younger or smaller Monstera, you may not see any cuts until it grows a bit more. My Monstera is quite a few years old which is why he is so big. As long as you keep Monsteras in a bright location, they grow very quickly.
Hi,
I recently bought a baby albino variegated monstera, and it had beautiful long roots. I let it sit in water for a few days before transferring it into a well drained pot with soil. Hwoever, i noticed, in a day or two, that the leaf started turning brown. After researching online, i found out that the roots might be rotting and checked for it. It indeed was rotting and i had to remove most/all of the rot and repot in fresh soil again. however, after doing so, the condition of the leaf did not improve and it actually only worsened. This morning, I checked the roots again. All but one main root (of about 7cm) had become rotten and squishy. So, i removed all of it again and put it in water to develop some roots. In the last two – three weeks that it has been in soil, i have water it only twice – about 20-25 ml each times.
Do you think this is fine and do you have any suggestions for me? I am new to monsteras, and this definitely has me worried.
*desperately looking for suggestions / help to revive my plant
Hi, Does the plant only have one leaf? The less leaves on a cutting, the slower they form new ones. As far as the root rot, it’s tricky. A lot of factors could have contributed to it but at this point, make sure it’s in well draining soil with lots of perlite and orchid bark. A regular potting mix is too stodgy by itself and will not help with root rot. I would keep doing what you’re doing, and be sure the cutting is in bright indirect light and never let it dry out at this stage. You can cut off the brown leaf if you haven’t already. Feel free to reach out again if you need more help!
Hi, in this paragraph”keep in mind, I performed this surgery in mid summer…”, the image shows some brown ‘leaves’ on the bottom of stem, is this alright with the plant? Mine is brown too, I’m a bit worry. Thank you
Hi Zoe, for the most part, yes it’s fine, but you may want to remove any very brown or dried leaves. If they’re green with browning on the edges, that’s ok.
Hi I was wondering what exactly air layering is? I have propagated pothos, snake plant and succulents before but I have never heard of air layering could you explain a little more of what the steps are and why it’s done? Do you do it after propagation? Sorry lol I’m just fascinated/ confused.
Hi Madison! It’s really for larger, woody plants with chunky stems like fiddle leaf figs and rubber tress, but it works for monsteras too. Basically you are wrapping the roots in wet moss and creating a moist environment for new roots to grow. Roots like the humidity and dampness the moss bring so they develop quickly. Then you can cut right below those roots and repot the plant! New leaves will grow where you’ve cut on the original plant.
Hi,
I want to propagate my split leaf, but I can’t really tell if it has aerial roots on the stems so I’m worried about cutting a piece off. It has tons below on the stalk part. I can send you pictures if that’s helpful. My family has 2 huge plants and we want to propagate to make new plants for our friends and family because they’re just unmanageable at this point. Thanks!
Hi Kim! Sure you can send me a photo on IG or facebook, but the aerial roots or nodes will look like little nubs. Usually there are nodes at every place there is a leaf so you should be fine to cut where there is a leaf. Feel free to send photos though.
Hi,
So my monsterra is very happily growing – a little too happily! It’s got almost a whole smaller plant growing within the same pot. I would like to repot this (currently it’s trying to grow under the sofa and I think it would be happier in its own pot away from the bigger one). It’s a fully developed plant with roots so I will remove the whole thing. Do I have to be careful when cutting roots? I don’t want to accidentally kill it, and was planning on just trying to get as take as much of the roots as possible. Also, is it best to propagate this in water, or just plant it straight away? Thank you so much!
Hi Ruth, that’s great! I have minis in all my monsteras and I honestly leave them in there. They eventually grow and make the plant look fuller and bushier, you may need to take it to get it to grow in a different direction. If you want to take it out still, yes, be careful removing the entire plant and roots. You can also propagate this tiny plant (and follow the instructions in my post) and have it form roots in water, leaving the actually rooted part in with the mother plant (this will produce more leaves, too). Either way will work, it just depends on what you are comfortable with. Good luck!
Hi I have a monstera plant and a ball got thrown and hit a stem and it broke off but right down the bottom where connecting to the main stem is there hope if I put this stem with a leaf in water it might grow roots?
Holding on to hope 🙂
Hi! Just a leaf with a stem will not produce roots, it has to have a node. It will look pretty in a vase though!
Hi there,
Thank for these very helpful instructions! I have had two cuttings in water for about two months now (had to perform drastic surgery because of insect infestation) and for a long time nothing happened. Now they have both developed new leaves but still no roots as far as I can see. Any suggestions for what to do next? Thanks, Carol
Hi Carol, new leaves are a good sign, and sometimes cuttings take a very long time. Be sure they’re in bright sun and in a warm location. Unfortunately the best thing to do is wait! Do look for any blackening on the stem and definitely check for bugs if the mother plant had any infestation.
Hi! I got a monstera cutting a few weeks ago and it has been sitting in water since then. It came with a leaf node and an aerial root. I noticed that the cover of the aerial root was not in the greatest shape though and i could easily take it off and expose the inner root. The upper and lower part of the node is also looking soft and brownish. Should i be worried? Should i take it out of the water and let it dry for a couple days first before putting it back in the water?
Hi! You may have an issue, but it’s hard to tell without a photo (feel free to send one to Facebook). A black or brown node is normal – what’s not normal is a mushy one. As long as the node is firm you should be fine, but it there is a funky smell or is it’s mushy and very soft to the touch, you may have a rotted cutting and it may not be salvageable.
Hi! Thanks for this helpful post 🙂 I am a bit confused from the photos and couldn’t find this question among the sea of comments… should the node itself be submerged in water or just the green stem part? Thanks!
The node must be submerged too, Carly. 🙂
Hi.. thank you for the amazing information… I am brand new to Monstera love and was gifted one, I named him Herbert, who I adore… I am being sent a Variegated stem, node, and leaf, and I think aerial root, from a friend of mine and it seems water would be much easier than the moss for a novice like myself. I am a little confused about what part(s) to submerge as someone I believe said to not submerge the aerial root so I am a bit confused and would be super sad if I messed her up… Would you recommend bottled or distilled water? Thank you for your guidance….
Herbert is a great name. I would do bottled water and you’ll want to submerge the node and aerial root, leave the leaves and most of the stem above water, the roots are really what need to be in water. Good luck!
Hi there, thank you for this amazing information!! I am so excited to propagate mine and have been carefully monitoring the growth of the senior and junior plants of a friend who propagated hers. I noticed where she cut on the senior plant a few months ago hasn’t had any new leaves grow since. I am worried if I cut my mother plant the will be no future growth on the branch I cut! Any tips to prevent this from happening?
If cut correctly, you should see growth almost immediately (as in a week or so) on the mother plant, and if the cut was a few months ago and there is nothing, something may be been cut wrong. Also, monsteras tend to pump out leaves slower in the dead of winter, so seasons are also a factor. You or she can send a photo to my Instagram and I’d be happy to take a look!
Hi can I do it in this of month October? You mentioned it that winter time will probably don’t works but here in Italy we are in south we have nice weather always sunny just nice not so cold.. Thank you..
Hi Debbie – you can! As long as it’s warm you have perfect conditions.
Hi I recently took 5 cuttings with the nodes, but put them directly in soil. I added 4 in a large pot and 1 in a 6 in pot. All of them are drooping. Well 1 is looking happy. Do you think I used a pot that is too big? Should I take them out of the soil and put them all in water until they root? Thank you
Hi! Yes, I would try the water method. Sometimes the dirt/soil isn’t enough to get them to root and if they are drooping it means water isn’t getting to the nodes and being absorbed. Try rooting in water instead.
Hi, I have a very large monstera mostly without leaves, I have chopped it into pieces about 6 inches long with a few round white rings, will they grow if fully submerged in water please?
They will, but you may want to try sphagnum moss instead since there are no leaves. You can follow my wetstick overview in this post – that should help! Submerging in water can work but the risk of the stems getting moldy is higher when there are no leaves, so sphagnum is probably best.
Hi! I cut a two leaves at a node and placed them in water a few months ago and so far nothing has happened! I change the water every 5 or so days and it is spring time in Australia so I thought it might have grown a root by now! I did cut it at a node but there was only a small stubby aerial root attached, not sure if this is a problem. Any tips or do I just keep waiting?
Hi Bridget, Keep waiting. Some cuttings, for some reason, take forever. I once took a cutting from my mature plant which rooted in a matter of days and another from a younger plant that took months. A few factors like this matter but keep patient and you can also leave the water longer – no need to change it that often if no roots are forming. I’d say once every couple weeks would be fine. Also be sure the cutting is in a warm location – that’s key.
Thank you! I will keep on waiting!
Hi! I was hoping you could help me, i want to bring a cutting of a monstera deliciosa from my grandaparents’ home, but the trip to my house is 12 hours long. Can a cutting survive that long without water or soil? Or maybe a I could just put a node, without a leaf, in a pot with water ? I would really appreciate your help
It can! Taking a plant with very moist soil on the roots wrapped in plastic will survive or a cutting with damp paper towels over the node will work too. Either way, the key is to keep the node or roots moist during the trip.
Hi, I have inherited what was a beautiful monstera. It was growing tall (about a meter) with beautiful leaves. It went on a cross country trip in a cold motorhome, surrounded by people and pets and looks very damaged and sad. Was was tall and strong is now leaning over left and right. Most leaves are droopy, many are damaged and torn, some have curled brown edges. Do I trim this? Repot? Tie it up with a stick in the middle to help grow up and tall again?
Thanks so much!
Hi Michelle, it probably is sad. I wouldn’t worry about the torn leaves, they may look unsightly but they’re fine. The curling leaves and droopiness is important. It needs to recover, so it may take a few months of it looking bad as it attempts to heal itself. I wouldn’t propagate it now since it’s in poor shape and any pieces you cut off may not survive. I’m not sure where you live but now would be a great time to place it in a sunny spot that’s warm and let it do its thing. Keep it very lightly moist, stake it up or provide a moss pole, and the key is providing a warm, sunny location. Also be sure to check for bugs, they notoriously harbor on sick plants. Good luck!
Hey i have recently been researching a lot about this plant. My friend gave me a cutting before i moved out, í propagated in water for now probably 3 months. It has a great deal of roots but i didn’t realize i should be changing the water and now i think it’s growing bacteria and doesn’t look to healthy (roots not leaves) it’s now over grown the vase i have it in but I’m in NY where it’s cold and not too sunny so I’m nervous to make any moves and not sure if i should clip some of the roots off?
Hi Emily, yes you can clip some off, anything brown or mushy. Keeping anything rotted will do more harm than good, so you can just cut those off and place the cutting in a new jar, using some of the water from before and some new water so you don’t shock the plant. From here, change the water every two weeks or so – good luck!
Hi Anastasia,
My monstera (leafy) has just grown upwards. Not out. So now that he’s tall (about 3 foot) he’s grown a bunch of aerial roots.. obviously to support himself. I’d like to propagate him to shorten him, but unsure of what to do with the aerial roots? I’m scared of upsetting him if I trim them off. But they’re lonnnnng!!
Hi Gemma, You can definitely propagate and you can just include the aerial roots in the propagation. For instance, when you cut the piece, including the roots which will sprout some growth too. If they are insanely long (like multiple feet) you can shorten the roots and cut them back too. These roots are more or less for water transportation and to hang onto trees in the wild. Hope that helps!
What happens to the original plant after it is cut for propagation? Does it continue to grow from where it was cut?
It does Darryl, a shoot will develop and start to grow perpendicular to the cut area. The mother plant will continue to grow too.
Hi,
My mother recently (today) left me home alone for a bit. So, me being the impulsive little heathen I am, decided to go dig up a beautiful, wild monstera (I think?) that I found in the woods behind my house. Unfortunately, some of the roots were damaged in the process ?. Do you think it will survive if I pot it? Or should I just try my luck propagating a handful of stems?
Hi Kyla, You can try either or both. I would personally replant the monstera first and then trim any excess top branches to propagate. As long as there are numerous healthy white roots you should be ok and the plant should live but be sure it’s in a bright location.
Not knowing what it was, I buried the first aerial root on my plant. I thought I would just unbury it but it has grown very long in just a week. Should I just leave it buried? Will I get more aerial roots so I can propagate?
Hi Julie! Yes, I would just keep it buried, it will 100% grow more aerial roots!
Hiya,
I have a monstera plant that’s become abit leggy and has afew new leave sprouting. Can I propagate the these branches while the new leaves are unfurling and repot them into the same pot as the mother or should i wait? They all have Aerial roots at the bottom but the new plants are growing at weird angles off the main plant stems. What should I do?
Hi Nia! Sounds exactly like what happened to Monty. I would wait until those leaves unfurl then propagate. Remember to only have a couple leaves per cutting or else roots will not develop as fast or super well. You can always chop the leggy parts into wetsticks and either give those away or propagate those in sphagnum. Also, keep whatever aerial roots you can. Hope that helps!
Hi there! I propagated my mini monstera and have 6-7 leaves sitting in water. My understanding is I should change the water every 2 weeks and they should hopefully be ready to repot in about 2 months? Do you recommend putting more than one leaf in the new pot or just one leaf per pot? Thank you!
Hi Brittany! That sounds right – I would actually change the water less, I usually do every month unless you have really hard water. And yes, in order to have a full plant, I would place 3-4 leaves (depending on size) per pot to be sure the plant looks full when it grows.
I know this post is a little old but I just wanted to say that my Monstera is also named Monty ?. And I have another one that I bought named Tera. Yours is so beautiful!
Hello! Really great post. I have two cuttings of what was an ageing Monstera propagating in water. One of them already has a few roots sprouting, the other one is a little slower, but I can see something coming out. My question is that both have two leaves, one of which is green, and the other is brown and drying. Should I cut the brown leaf off, and do it close to the stem or a little further up? One of the green leaves also has some brown tips, that were there before cutting to propagate, and I believe were due to too much sun – should I trim it? Read somewhere online that they won’t heal and should be trimmed, but unsure if 1) the trim will heal or just do more harm than good and 2) if I should wait until it’s repotted and thriving in its new soil. Thanks in advance for any help you are able to give.
Hi Mariana! I would 100& cut the brown one, that is just hanging on but will die off eventually. I would leave the brown tips though on the other leaf, they aren’t hurting the plant or draining energy from it like spent leaves do. I would just leave that leaf until it’s repotted. They sound healthy though!
Hi Anastasia
my monstera was getting lots of long aerial roots, so I cut off a part consisting of 4.5 leaves, and left it in water for about a week. I wasnt really sure what new growth I was looking out for, so I figured the aerial roots would be enough and planted them in a pot. There were 4 long aerials. Now that Ive read your blog I realize I shouldve waited longer for young roots!! Will my plant survive or should I dig it back out and put them in water again? Thank you so much!!!
You should be fine – but yes in the future they need those roots!
Hello! I have a Monstera that’s been completely destroyed by Thrips 🙁 I cut off a bit of the top with the node and stem to propagate, If I cut the rest right off down to the soil do you know if it would regrow?
It definitely will! I would try to treat with neem first but thrips are awful so you can definitely cut back and monsteras grow quickly. Your plant will be just fine!
Hi. I need to propagate my monstera but im worried if i cut the top three leaves with a node will the original plant continue to grow? Obviously each leaf grows the next leaf so what happens after theyve been cut? Sorry probably not making my question very clear
Hi Monique! As long there is still nodes left on the plant it will continue to grow! When I chopped Monty I cut a few places that only had node and no leaves and other places with leaves and node and everything grew back in time.
Hi! I’ve been propagating a couple monstera cuttings over the last 6 or so months. I haven’t transferred them into soil bc I thought they were loving the water so much w all the root growth. One of the newest leaves is turning a very light green (lighter than the usual new growth green) and I’m concerned! The plant doesn’t receive a lot of sunlight because it’s on the side of my dresser which blocks out direct light but the room itself receives a lot of sun throughout the day.
It can be a deficiency – have you changed the water? New cutting needs a bit more sun since they’re trying to grow new roots. Try moving to a sunnier spot, let that leaf unfurl and then monitor the next one. Hopefully it will recover!
Hi! I have a large monstera with many aerial roots. How long between prunings should I wait? I don’t want to shock the plant too much.
Honestly I’ve chopped mine down quite a bit and that gives it a boost to start new growth. As long as it isn’t all of the leaves, a decent chop will be fine.